tauri2 task manager
本项目是一个使用 Tauri 2 + Vue 构建的本地个人日程 / 任务管理桌面应用,同时包含一个倒计时工具,用于简单管理日常任务和部分需要计时的任务。主要是网上的工具都功能太多了,想做个极简的工具来用用。后续如果有时间的话可能会继续完善一些功能。
1. 项目概览
1.1 技术栈
Tauri 2 + Vue 3 + Rust
1.2. 项目结构
task-manager
├── package.json              # 前端依赖与脚本
├── src                       # 前端 Vue 代码
│   ├── App.vue               # 入口组件 / 主布局
│   ├── views
│   │   ├── Countdown.vue     # 倒计时浮窗
│   │   ├── FloatBall.vue     # 悬浮球窗口
│   │   └── CustomContextMenu.vue # 自定义右键菜单
│   └── utils
│       ├── task.js           # 任务相关前端工具(创建/解析/格式化等)
│       ├── float-window.js   # 悬浮窗口通用逻辑(拖拽、穿透、定位)
│       ├── window.js         # 打开主窗口的辅助函数
│       ├── drag.js           # 拖拽相关工具函数
│       ├── menu.js           # 菜单
│       └── tools.js          # 其他工具函数(如事件通信等)
└── src-tauri                 # Tauri / Rust 后端
    ├── tauri.conf.json       # Tauri 配置,多窗口定义
    ├── capabilities
    │   └── default.json      # Tauri 权限配置
    └── src
        ├── lib.rs            # Tauri 入口,注册命令、初始化
        ├── hook.rs           # 监听鼠标事件
        └── task
            ├── mod.rs        # `task` 模块入口,导出子模块
            └── time.rs       # 时间相关工具函数
1.3. 项目地址
https://github.com/lxmghct/task-manager
2. 功能实现
2.1. 任务管理
任务管理主要是任务的增删改查功能,接下来将分别从前端和后端来介绍实现细节。
2.1.1. 基本界面实现
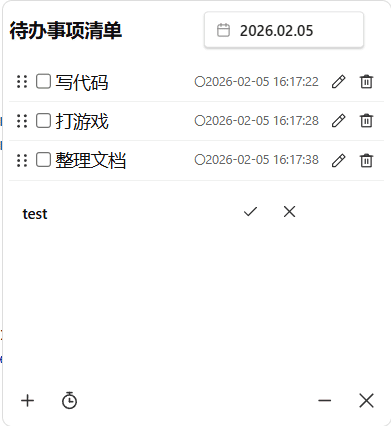
界面在设计上分为三块:
- 顶部显示应用名称和当前日期
- 中间是任务列表,展示所有任务的标题、时间和状态
- 底部是其他操作按钮,比如最小化、退出程序等。
1️⃣ 任务列表
具体需求:
- 列表显示当天的所有任务,按照时间顺序排列
- 每一行显示任务标题、时间和状态
- 最左侧有个用于拖动调整顺序的图标,然后一次是勾选框、任务名、时间、编辑按钮和删除按钮
- 点击编辑按钮可以修改任务的标题和时间,修改时间时会弹出一个时间选择器,完成后将会保存到指定的日期文件里
- 点击删除按钮可以删除任务
- 点击勾选框可以切换任务的完成状态
为了实现这些需求,需要用到两个组件来降低代码的复杂度(这里不使用像 Element Plus 这样的 UI 库,主要是为了进一步压缩程序体积):
vue-datepicker:一个轻量级的日期选择组件,用于编辑任务时间,不使用原生的<input type="date">是因为它的样式和交互体验比较差,后面还有根据任务状态调整样式的需求,原生的日期选择器是做不到的。sortablejs:一个用于实现拖拽排序的库,方便用户调整任务顺序
<main>
  <ul class="task-list" id="task-list">
    <li v-for="task in tasks" :key="task.id" class="task-item">
      <img class="drag-handle" src="./assets/icons/drag-handle.svg" />
      <input
        type="checkbox"
        class="check-box"
        :checked="task.finishTime !== null"
        @change="toggleStatus(task)"
      />
      <div class="task-body" @dblclick="startEdit(task)">
        <template v-if="!task.edit">
          <div class="task-content">
            <div :class="['task-text', { done: task.finishTime != null }]">
              {{ task.text }}
            </div>
            <!-- createTime -->
            <div class="task-date">
              〇{{ formatDateTime(task.createTime) }}
              <template v-if="task.finishTime">
                <br />
                ✔{{ formatDateTime(task.finishTime) }}
              </template>
            </div>
          </div>
        </template>
        <template v-else>
          <input
            :id="inputDomId(task.id)"
            v-model="task.tempText"
            @keyup.enter="saveEdit(task)"
            @keyup.esc="cancelEdit(task)"
            class="edit-input"
          />
          <VueDatePicker
            class="mini-date-picker"
            v-model="task.tempCreateTime"
            auto-apply
            :ui="{ dayClass }"
            :locale="zhCN"
            :formats="{ input: 'yyyy.MM.dd', preview: 'yyyy/MM/dd' }"
            :text-input="{ selectOnFocus: true }"
            @open="openCalendar"
            @update-month-year="onMonthChange"
            @update:model-value="
              task.tempCreateTimeStr = formatDateTime(task.tempCreateTime)
            "
          >
            <template #trigger>
              <div class="task-date">〇{{ task.tempCreateTimeStr }}</div>
            </template>
            <template #clear-icon="{ clear }"> </template>
          </VueDatePicker>
        </template>
      </div>
      <div class="task-actions">
        <template v-if="task.edit">
          <button class="icon-btn" @click="saveEdit(task)" title="保存">
            <img class="icon" src="./assets/icons/correct.svg" />
          </button>
          <button class="icon-btn" @click="cancelEdit(task)" title="取消">
            <img class="icon" src="./assets/icons/error.svg" />
          </button>
        </template>
        <template v-else>
          <button class="icon-btn" @click="startEdit(task)" title="编辑">
            <img src="./assets/icons/edit.svg" />
          </button>
          <button class="icon-btn" @click="deleteTask(task)" title="删除">
            <img src="./assets/icons/delete.svg" />
          </button>
        </template>
      </div>
    </li>
  </ul>

  <div class="add-area" v-show="newTaskForm.edit">
    <input
      id="new-task-input"
      class="check-box"
      v-model="newTaskForm.text"
      placeholder="添加新任务,按回车或点击✔"
      @keyup.enter="addTask"
    />
    <button class="icon-btn" @click="addTask">
      <img src="./assets/icons/correct.svg" />
    </button>
    <button class="icon-btn" @click="newTaskForm.edit = false">
      <img src="./assets/icons/error.svg" />
    </button>
  </div>
</main>
其他的一些常规的前端代码这里就不展开介绍了。主要说一下 SortableJS 的使用:
onMounted(() => {
  Sortable.create(document.getElementById("task-list"), {
    handle: ".drag-handle",
    animation: 150,
    forceFallback: true,
    onEnd(evt) {
      if (evt.newIndex === evt.oldIndex) return;
      const movedItem = tasks.value.splice(evt.oldIndex, 1)[0];
      tasks.value.splice(evt.newIndex, 0, movedItem);
      saveTasks(currentDate.value, tasks.value, false).catch((e) => {
        tasks.value.splice(evt.newIndex, 1);
        tasks.value.splice(evt.oldIndex, 0, movedItem);
      });
    },
  });
});
在组件挂载后,使用 Sortable.create 来初始化任务列表的拖拽功能。通过 handle 选项指定只有拖动 .drag-handle 元素时才会触发排序,这里的话是用的一个 svg 图片。animation 选项设置动画效果。在 onEnd 回调中,我们检查任务是否真的被移动了,如果是,则更新任务数组的顺序并保存到文件中。如果保存失败,则回滚到原来的顺序。
在后端文件里实际上每个任务仅保存了名称、创建时间、完成时间,并没有明确的主键,所以无论编辑还是改变顺序,都是直接将整个任务列表覆盖式保存到文件里的。而前端为了不让列表里的数据乱掉,生成了一个临时的 id 字段来作为 Vue 渲染列表的 key.
关于一些任务持久化的接口,这里简单展示一下保存任务的调用:
import { invoke } from "@tauri-apps/api/core";

export function saveTasks(date, tasks, append = true) {
  return new Promise((resolve, reject) => {
    invoke("save_tasks", {
      date: formatDate(date),
      tasks: reverseTransformTask(tasks),
      append,
    })
      .then(() => {
        resolve();
      })
      .catch((e) => {
        console.error("saveTasks error", e);
        showMessage("保存任务失败", "error");
        reject(e);
      });
  });
}
这里调用了 Tauri 的 invoke 方法来调用 Rust 后端的 save_tasks 命令。``invoke`本身是异步的,为了方便统一调用,这里重新将结果包装成了一个 Promise 对象。
2️⃣ 界面顶部设计
界面顶部设计比较简单,主要是显示应用名称和当前日期。日期会根据用户选择的日期进行更新,默认显示当天的日期。
<header>
  <div class="title">待办事项清单</div>
  <div>
    <VueDatePicker
      class="date-picker"
      v-model="currentDate"
      auto-apply
      :ui="{ dayClass }"
      :locale="zhCN"
      :formats="{ input: 'yyyy.MM.dd', preview: 'yyyy/MM/dd' }"
      :text-input="{ selectOnFocus: true }"
      :time-config="{ enableTimePicker: false }"
      @update-month-year="onMonthChange"
      @update:model-value="onDateChange"
      @open="openCalendar"
    >
      <template #clear-icon="{ clear }"> </template>
    </VueDatePicker>
  </div>
</header>
这里要说的一点是这个日历是会根据任务状态来调整样式的,蓝色背景是当前日期,红色背景是有未完成任务的日期,绿色背景是全部任务都已完成的日期,这个功能也是通过 vue-datepicker 的 dayClass 这个 API 来实现的,主要是根据日期去读取对应的任务文件,然后根据任务状态来返回不同的 class。
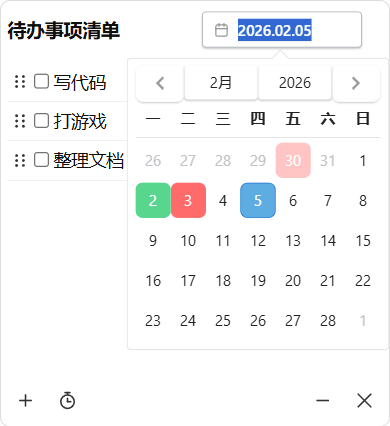
function dayClass(d) {
  const ds = formatDate(d);
  const task = taskMap.value.get(ds);

  const today = new Date();
  const isToday = ds === formatDate(today);

  if (isToday) return "today";
  if (!task) return "";
  const isOtherMonth = d.getMonth() !== currentDate.value.getMonth();
  let result = task.completed === task.total ? "complete" : "incomplete";
  return result + (isOtherMonth ? " other-month" : "");
}
由于日历有时会看到上个月最后几天和下个月前几天,非本月的颜色会稍微淡一些。获取这三个月任务的相关 js 代码如下:
export async function getThreeMonthsStats(date) {
  const curr = new Date(date);
  const last = new Date(date);
  const next = new Date(date);

  last.setMonth(last.getMonth() - 1);
  next.setMonth(next.getMonth() + 1);

  const [lastStats, currStats, nextStats] = await Promise.all([
    invoke("get_monthly_task_stats", ym(last)),
    invoke("get_monthly_task_stats", ym(curr)),
    invoke("get_monthly_task_stats", ym(next)),
  ]);

  return [lastStats, currStats, nextStats];
}

async function loadThreeMonthData(date) {
  const [prev, curr, next] = await getThreeMonthsStats(date);
  taskMap.value.clear();
  fillTaskMap([prev, curr, next]);
}

// 日期选择器切换月份时触发
async function onMonthChange({ instance, month, year }) {
  const d = new Date(year, month - 1);
  await loadThreeMonthData(d);
}

async function openCalendar() {
  loadThreeMonthData(currentDate.value);
}
3️⃣ 底部操作按钮
底部的操作按钮主要是添加新任务、打开倒计时窗口、打开悬浮球窗口和退出程序。这部分没有要额外展开介绍的内容,主要是一些按钮的点击事件绑定和样式设计。
<footer>
  <button class="icon-btn" @click="editNewTask">
    <img src="./assets/icons/plus.svg" />
  </button>
  <button
    class="icon-btn"
    @click="openWindow('countdown', 'open-countdown')"
  >
    <img src="./assets/icons/stopwatch-start.svg" />
  </button>
  <button
    class="icon-btn minimize-btn"
    @click="openWindow('float-ball', 'open-float-ball')"
  >
    <img src="./assets/icons/minus.svg" />
  </button>
  <button class="icon-btn" @click="invoke('exit_app')">
    <img src="./assets/icons/error.svg" />
  </button>
</footer>
2.1.2. 窗口拖拽
在一般浏览器里通过 js 是无法实现窗口拖动的,但在 Tauri 里是可以的,Tauri 提供了 @tauri-apps/api/webviewWindow 这个模块来操作窗口相关的功能。实现的思路也比较简单,就是监听鼠标事件,在鼠标按下时记录当前鼠标位置和窗口位置,在鼠标移动时计算新的窗口位置并调用 setPosition 方法来更新窗口位置,在鼠标松开时停止拖动。
import { WebviewWindow } from "@tauri-apps/api/webviewWindow";
import { PhysicalPosition } from "@tauri-apps/api/dpi";

const state = {
  mouseStartX: 0,
  mouseStartY: 0,
  windowStartX: 0,
  windowStartY: 0,
  isDragging: false,
};

export function startDragEvent(event, windowLabel, mousemoveCallback, mouseupCallback) {
  if (event.button !== 0) return;
  state.mouseStartX = event.screenX;
  state.mouseStartY = event.screenY;
  state.isDragging = true;

  WebviewWindow.getByLabel(windowLabel).then(async (w) => {
    const pos = await w.outerPosition();
    state.windowStartX = pos.x;
    state.windowStartY = pos.y;

    const move = async (e2) => {
      if (!state.isDragging) return;
      const deltaX = e2.screenX - state.mouseStartX;
      const deltaY = e2.screenY - state.mouseStartY;
      const newPos = new PhysicalPosition(
        state.windowStartX + Math.floor(deltaX * window.devicePixelRatio),
        state.windowStartY + Math.floor(deltaY * window.devicePixelRatio)
      );
      w.setPosition(newPos);
      mousemoveCallback && mousemoveCallback(e2);
    };

    const up = e => {
      state.isDragging = false;
      window.removeEventListener("mousemove", move);
      window.removeEventListener("mouseup", up);
      mouseupCallback && mouseupCallback(e);
    };

    window.addEventListener("mousemove", move);
    window.addEventListener("mouseup", up);
  });
  return state;
}
这里有几个注意点:
-
需要乘以
window.devicePixelRatio来适配不同屏幕的 DPI,否则在高 DPI 屏幕上拖动会不准确。这个值和电脑的缩放设置有关,通常是 1.25、1.5等。也就是右键桌面->显示设置->缩放与布局->更改文本、应用等项目的大小这个值。在@tauri-apps/api/dpi下有LogicalPosition和PhysicalPosition,这里使用了PhysicalPosition所以是这样的计算方式。 -
关于坐标系,Tauri 的
screenX和screenY是相对于整个屏幕的坐标,而不是相对于窗口的坐标,所以在计算新的窗口位置时需要使用鼠标的屏幕坐标加上窗口的初始位置。
使用该函数的方法示例,其实前面提到的几个组件都用到了这个拖动事件:
<header class="header" @mousedown.self="(e) => startDragEvent(e, 'main')"></header>
<main class="main" @mousedown.self="(e) => startDragEvent(e, 'main')"></main>
<footer class="footer" @mousedown.self="(e) => startDragEvent(e, 'main')"></footer>
在各组件里反复使用而并不是在最外层 div 来绑定这个事件,主要是因为事件捕获的问题,如果没处理好就很难让事件传递到最外层的组件,所以为了省事就直接在每个组件里都绑定一次了。
2.1.3. 任务持久化相关 Rust 代码
任务的持久化主要是通过 Tauri 的命令系统来实现的,前端调用 invoke 方法来调用 Rust 后端的命令,后端通过 #[tauri::command] 来暴露函数给前端调用。
基本数据结构:
#[derive(Debug, Serialize, Deserialize)]
pub struct Task {
    pub create_time: String, // YYYY-MM-DD HH:MM:SS
    pub finish_time: String, // YYYY-MM-DD HH:MM:SS, 空字符串表示未完成
    pub text: String,
}
由于是一些基本的文件操作,这里只展示一个文件读取取任务列表的命令实现:
fn _read_tasks(path: &str) -> Result<Vec<Task>> {
    if !Path::new(path).exists() {
        return Ok(vec![]);
    }
    let file = File::open(path)?;
    let mut reader = ReaderBuilder::new()
        .has_headers(false)
        .from_reader(BufReader::new(file));

    let mut output = vec![];
    for result in reader.records() {
        match result {
            Ok(rec) => {
                // [create_time, finish_time, text]
                let fields: Vec<String> = rec.iter().map(|s| s.to_string()).collect();
                let (create_time, finish_time, text) = if fields.len() >= 3 {
                    (fields[0].clone(), fields[1].clone(), fields[2].clone())
                } else {
                    continue;
                };
                let t = Task {
                    create_time: create_time.clone(),
                    finish_time: finish_time.clone(),
                    text: text.clone(),
                };
                if t.is_valid() {
                    output.push(t);
                }
            }
            Err(_) => continue,
        }
    }
    Ok(output)
}

fn get_task_path(date: &str) -> Result<(String, String)> {
    if !is_valid_date(date) {
        return Err(anyhow::anyhow!("Invalid date format"));
    }
    let parts: Vec<&str> = date.split('-').collect();
    assert!(parts.len() == 3);
    let year = parts[0];
    let month = parts[1];
    let dir = format!("{}/{}/{}", TASK_DIR, year, month);
    let path = format!("{}/task_{}.txt", dir, date);
    Ok((dir, path))
}

pub fn read_tasks(date: &str) -> Result<Vec<Task>> {
    let (_, path) = get_task_path(date)?;
    _read_tasks(&path)
}

#[tauri::command]
fn read_tasks(date: &str) -> Vec<task::Task> {
    task::read_tasks(date).unwrap_or_default()
}
还有一个是获取某个月每天任务完成情况的实现,下面是数据结构:
#[derive(Debug, Serialize, Deserialize)]
pub struct TaskStats {
    pub date: String,
    pub total: usize,
    pub completed: usize,
}
具体接口实现:
pub fn get_monthly_task_stats(year: i32, month: u32) -> Result<Vec<TaskStats>> {
    let dir = format!("{}/{:04}/{:02}", TASK_DIR, year, month);
    if !Path::new(&dir).exists() {
        return Ok(vec![]);
    }
    let mut stats = vec![];
    let days = days_in_month(year, month);

    for day in 1..=days {
        let date = format!("{:04}-{:02}-{:02}", year, month, day);
        let (_, path) = get_task_path(&date)?;
        let tasks = _read_tasks(&path)?;
        if tasks.is_empty() {
            continue;
        }
        let total = tasks.len();
        let completed = tasks.iter().filter(|t| !t.finish_time.is_empty()).count();
        stats.push(TaskStats {
            date,
            total,
            completed,
        });
    }

    Ok(stats)
}
2.2. 悬浮球实现
2.2.1. 点击穿透实现
一开始设计悬浮球窗口的时候采用的是和上面任务列表窗口一样的拖动事件实现方式,实现起来也比较容易。透明化窗口也只需要在 tauri.conf.json 里设置 transparent: true 就行了。
{
  "app": {
    "windows": [
      {
        "label": "float-ball",
        "width": 62,
        "height": 62,
        "decorations": false,
        "transparent": true,
        "resizable": false,
        "alwaysOnTop": true,
        "visible": false,
        "skipTaskbar": true,
        "shadow": false,
        "url": "src/html/float-ball.html"
      }
    ]
  }
}
不过这种实现目前无法实现点击穿透的功能。悬浮球是圆形的,鼠标如果在窗口的四个角上,则还是会被窗口捕获到的,所以无法实现真正的点击穿透。
后来在 Tauri 的官方文档里找到了setIgnoreCursorEvents(true) 来实现点击穿透,基本逻辑是:
如果鼠标距离圆心小于半径,则setIgnoreCursorEvents(false),否则 setIgnoreCursorEvents(true)。这样就可以实现真正的点击穿透了。
但是有个问题,一旦调用了 setIgnoreCursorEvents(true),窗口就无法再接收到任何鼠标事件了,后续也就没办法判断调用 setIgnoreCursorEvents(false) 的时机了。这里 tauri 就没有 electron 来的方便,electron 里有个 BrowserWindow.setIgnoreMouseEvents 方法,可以传第二个参数 { forward: true } 来实现点击穿透的同时还能让窗口接收鼠标事件,tauri 目前还没有提供类似的功能,所以这个问题就需要另外解决。
那么就需要在浏览器之外仍然保持对鼠标事件的监听,参考:https://github.com/Xinyu-Li-123/tauri-clickthrough-demo
使用 rdev 这个库来监听全局的鼠标事件,在 Rust 里计算鼠标位置和悬浮球的位置关系来决定是否调用 setIgnoreCursorEvents 来实现点击穿透。
use rdev::{listen, Event, EventType};
use tauri::{WebviewWindow, Emitter};
use serde::Serialize;

#[derive(Serialize, Clone)]
struct MousePos { x: f64, y: f64 }

pub fn start_global_mouse_stream(window: WebviewWindow) {
    std::thread::spawn(move || {
        let callback = move |event: Event| {
            if let EventType::MouseMove { x, y } = event.event_type {
                let _ = window.emit("device-mouse-move", MousePos { x, y });
            }
        };
        if let Err(e) = listen(callback) {
            eprintln!("rdev error: {:?}", e);
        }
    });
}
然后前端监听 device-mouse-move 事件来获取鼠标位置,根据鼠标位置和悬浮球的位置关系来调用 setIgnoreCursorEvents 来实现点击穿透。
import { WebviewWindow } from "@tauri-apps/api/webviewWindow";
import { PhysicalPosition } from "@tauri-apps/api/dpi";
import { startDragEvent } from "./drag.js";

/**
 * 悬浮窗口通用逻辑
 * @param {Object} options
 * @param {() => HTMLElement|null} options.getElement - 返回需要计算圆心和半径的 DOM(image / canvas)
 * @param {number|null} options.fixedRadius - 固定半径(如果 DOM 不规则大小/需要固定半径)
 * @param {string} options.dragKey - startDragEvent 的 key(float-ball / countdown)
 * @param {(e: MouseEvent) => boolean} [options.ignoreStartDrag] - 判断是否允许开始拖拽
 */
export function useFloatingWindow(options) {
  const win = WebviewWindow.getCurrent();
  let isVisible = false;

  // --- 鼠标拖拽 ---
  let dragData = { isDragging: false };

  const startDrag = (e) => {
    if (dragData.isDragging) return;
    if (options.ignoreStartDrag && options.ignoreStartDrag(e)) return;
    if (e.button !== 0) return;
    dragData = startDragEvent(e, options.dragKey, null, () => {
      clickThrough.update();
    });
  };

  // --- 悬浮圆检测 & 穿透点击 ---
  const clickThrough = {
    isIgnored: false,
    circleCenter: { x: 0, y: 0 },
    radius: options.fixedRadius || 0,
    r2: 0,
    update() {
      const el = options.getElement();
      if (!el) return;
      const rect = el.getBoundingClientRect();

      // DOM 模式
      let radius = options.fixedRadius ?? rect.height / 2;

      this.circleCenter = {
        x:
          (window.screenLeft + rect.left + rect.width / 2) *
          window.devicePixelRatio,
        y:
          (window.screenTop + rect.top + rect.height / 2) *
          window.devicePixelRatio,
      };

      this.radius = radius * window.devicePixelRatio;
      this.r2 = this.radius * this.radius;
    },
    isInCircle(x, y) {
      const dx = x - this.circleCenter.x;
      const dy = y - this.circleCenter.y;
      return dx * dx + dy * dy <= this.r2;
    },
  };

  // 公共入口注册函数
  function registerOpenEvent(eventName) {
    win.listen(eventName, ({ payload }) => {
      isVisible = true;
      win.setIgnoreCursorEvents(false);
      win.setIgnoreCursorEvents(true);
      win.setIgnoreCursorEvents(false);
      clickThrough.isIgnored = false;

      // 重新定位弹出窗
      let x = payload.x > 0 ? payload.x : 0;
      let y = payload.y > 0 ? payload.y : 0;
      x = x + 60 > window.screen.width ? x - 60 : x;
      y = y + 60 > window.screen.height ? y - 60 : y;

      win
        .setPosition(
          new PhysicalPosition(
            Math.floor(x * window.devicePixelRatio),
            Math.floor(y * window.devicePixelRatio)
          )
        )
        .then(() => {
          win.show();
          clickThrough.update();
        });
    });
  }

  // 鼠标区域检测逻辑
  win.listen("device-mouse-move", ({ payload }) => {
    if (!isVisible) return;
    const isInArea = clickThrough.isInCircle(payload.x, payload.y);
    const shouldIgnore = !dragData.isDragging && !isInArea;
    if (shouldIgnore !== clickThrough.isIgnored) {
      win.setIgnoreCursorEvents(shouldIgnore);
      clickThrough.isIgnored = shouldIgnore;
    }
  });

  return {
    startDrag,
    clickThrough,
    registerOpenEvent,
    setVisible(v) {
      isVisible = v;
    },
    getVisible() {
      return isVisible;
    }
  };
}
这里由于组件要复用,所以封装成了一个 useFloatingWindow 的函数来处理悬浮窗口的通用逻辑,组件里只需要调用这个函数来注册事件和更新圆心半径等信息就行了。悬浮球和后面的计时器都会用到这个函数来实现点击穿透的功能。
最后效果是这样的:
这里有个额外要说的地方,代码里面有调用 setIgnoreCursorEvents 三次的操作,如果只调用一次的话,鼠标首次移动到悬浮球内部会触发重绘,导致变白。目前我没有别的解决方式,所以采用的方法就是让重绘在用户操作之前提前发生。经过多次尝试,发现想要稳定不变白至少需要执行三次这个方法。
    win.setIgnoreCursorEvents(false);
    win.setIgnoreCursorEvents(true); // 这一步会触发重绘导致背景变白
    win.setIgnoreCursorEvents(false); // 再次设置回正常状态
2.2.2. 右键菜单实现
右键点击悬浮球出现菜单,这个实现起来就比较容易,纯 js 就可以实现了:
// 传入菜单数组,每个元素格式:
// { label: "xxxx" 或 "<b>HTML</b>", onClick: () => {} }
export async function openMenu(menuItems, x, y) {
  const label = "custom-context-menu";

  // 如果已经有菜单存在 → 先关闭
  const exists = await WebviewWindow.getByLabel(label);
  if (exists) {
    await exists.close();
  }

  const labelList = menuItems.map((item) => item.label);
  const callbackList = menuItems.map((item) =>
    typeof item.onClick === "function" ? item.onClick : null
  );

  // 创建新菜单窗口
  const menuWin = new WebviewWindow(label, {
    url: `/src/html/custom-context-menu.html?data=${encodeURIComponent(
      JSON.stringify(labelList)
    )}`,
    decorations: false,
    transparent: true,
    alwaysOnTop: true,
    skipTaskbar: true,
    resizable: false,
    shadow: false,
    visible: false, // 防止闪烁,先隐藏,等内容加载完再显示
    width: 200,
    height: menuItems.length * 40 + 16,
    x,
    y,
  });
  menuWin.once("tauri://error", function (e) {
    console.error(e);
  });

  let unlisten = null;
  // 监听菜单项点击事件
  unlisten = await listen("context-menu-item-click", async (event) => {
    const index = event.payload.index;
    if (index >= 0 && index < menuItems.length) {
      const callback = callbackList[index];
      if (callback) {
        callback();
      }
    }
    if (unlisten) {
      unlisten();
    }
  });

  return menuWin;
}
这里菜单不能像一般浏览器前端一样创建一个 fixed 定位的 div 来当做菜单,这种方式无法超出当前窗口也就是悬浮球的范围来显示,所以只能通过创建一个新的窗口来当做菜单了。菜单项的点击事件通过 Tauri 的事件系统来通信,菜单项被点击后会发送一个 context-menu-item-click 的事件,主窗口监听这个事件来执行对应的回调函数。
创建WebviewWindow是需要一定开销的,所以实际使用时,右键会有一定的延迟才会出现菜单,不过延迟在可接受范围内。
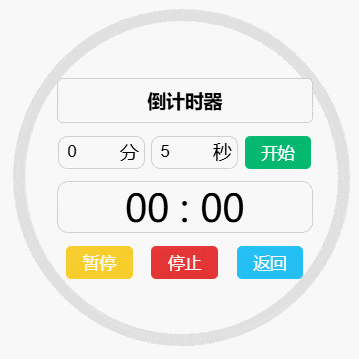
2.3. 倒计时工具实现
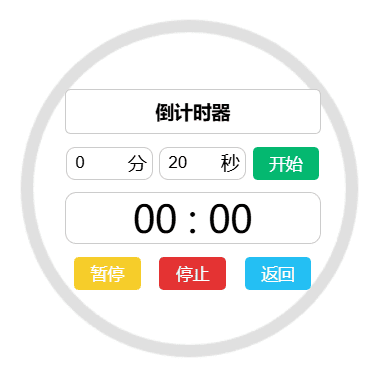
倒计时界面上我打算设计成一个圆形的界面,中间显示剩余时间,还有几个基本输入框和按钮。进度条则是整个圆周的一个环形进度条,随着时间的流逝逐渐变短。
2.3.1. 点击穿透实现
倒计时窗口的点击穿透实现和悬浮球是一样的,复用悬浮球的组件即可:
const { startDrag, clickThrough, registerOpenEvent, setVisible } = useFloatingWindow({
  fixedRadius: 130,
  dragKey: "countdown",
  getElement: () => canvas.value,
  ignoreStartDrag: (e) => ["BUTTON", "INPUT"].includes(e.target.tagName),
});
同时在 rust 给倒计时窗口传递鼠标事件:
#[cfg_attr(mobile, tauri::mobile_entry_point)]
pub fn run() {
    tauri::Builder::default()
        .setup(|app| {
            // 传递鼠标移动事件
            let window = app.get_webview_window("float-ball").unwrap();
            hook::start_global_mouse_stream(window);
            let window = app.get_webview_window("countdown").unwrap();
            hook::start_global_mouse_stream(window);
            // 其他初始化代码...
            Ok(())
        })
        .plugin(tauri_plugin_opener::init())
        .invoke_handler(tauri::generate_handler![/*命令列表*/])
        .run(tauri::generate_context!())
        .expect("error while running tauri application");
}
2.3.2. 圆形进度条实现
圆形进度条的实现主要是通过 Canvas 来绘制的:
const drawCircle = () => {
  const ctx = canvas.value.getContext("2d");
  const radius = circleRadius;
  ctx.clearRect(0, 0, canvas.value.width, canvas.value.height);

  ctx.lineWidth = 10;
  ctx.strokeStyle = "#e0e0e0";
  ctx.beginPath();
  ctx.arc(150, 150, radius, 0, Math.PI * 2);
  ctx.stroke();

  if (!state.value.isRunning && !state.value.isFlashing) return;

  if (state.value.isFlashing) {
    ctx.strokeStyle = state.value.flashState ? "#31ddf4" : "#e0e0e0";
    ctx.beginPath();
    ctx.arc(150, 150, radius, 0, Math.PI * 2);
    ctx.stroke();
    return;
  }

  const progress = 1 - remainingSeconds / totalSeconds;
  const start = -Math.PI / 2;
  const end = start + Math.PI * 2 * progress;

  const red = Math.min(255, 255 * progress);
  const green = Math.min(255, 255 * (1 - progress));
  ctx.strokeStyle = state.value.isPaused ? "#FFC107" : `rgb(${red},${green},0)`;

  ctx.beginPath();
  ctx.arc(150, 150, radius, start, end);
  ctx.stroke();
};
首先绘制一个灰色的完整圆作为背景,然后根据剩余时间和总时间的比例来计算进度,进度越大,绘制的圆弧就越长。通过改变 strokeStyle 来实现不同状态下的颜色变化,比如暂停时变成黄色,正常运行时从绿色逐渐变成红色。
2.3.3. 计时逻辑实现
首先是全局状态控制:
const state = ref({
  isRunning: false,
  isPaused: false,
  isFlashing: false,
  flashState: false,
});
这里 flashState 是控制当倒计时结束时,整个进度条开始闪烁以提示用户时间到。
以下是几个状态转换的函数:
const startCountdown = () => {
  stopFlashing();
  remainingSeconds = inputTime.value.minutes * 60 + inputTime.value.seconds;
  totalSeconds = remainingSeconds;
  if (totalSeconds <= 0) return;

  state.value.isRunning = true;
  state.value.isPaused = false;

  interval = setInterval(updateCountdown, 1000);
  updateDisplayTime();
  drawCircle();
};

const updateCountdown = () => {
  remainingSeconds--;
  drawCircle();
  updateDisplayTime();

  if (remainingSeconds <= 0) {
    clearInterval(interval);
    state.value.isRunning = false;
    startFlashing();
  }
};

const pauseCountdown = () => {
  if (state.value.isPaused) {
    interval = setInterval(updateCountdown, 1000);
  } else {
    clearInterval(interval);
  }
  state.value.isPaused = !state.value.isPaused;
  drawCircle();
};

const stopCountdown = () => {
  clearInterval(interval);
  stopFlashing();
  state.value.isRunning = false;
  state.value.isPaused = false;
  remainingSeconds = 0;
  drawCircle();
};

const startFlashing = () => {
  state.value.isFlashing = true;
  flashInterval = setInterval(() => {
    state.value.flashState = !state.value.flashState;
    drawCircle();
  }, 500);
};

const stopFlashing = () => {
  state.value.isFlashing = false;
  state.value.flashState = false;
  clearInterval(flashInterval);
};
2.4. 其他功能实现
2.4.1. 系统托盘实现
#[cfg_attr(mobile, tauri::mobile_entry_point)]
pub fn run() {
    tauri::Builder::default()
        .setup(|app| {
            // 系统托盘
            let open_main_i = MenuItem::with_id(app, "open_main", "打开窗口", true, None::<&str>)?;
            let quit_i = MenuItem::with_id(app, "quit", "退出", true, None::<&str>)?;
            let menu = Menu::with_items(app, &[&open_main_i, &quit_i])?;
            let _ = TrayIconBuilder::new()
                .menu(&menu)
                .icon(app.default_window_icon().unwrap().clone())
                .on_menu_event(|app, event| match event.id.as_ref() {
                    "open_main" => {
                        if let Some(window) = app.get_webview_window("float-ball") {
                            window.emit("open-main", ()).unwrap();
                        }
                    }
                    "quit" => {
                        println!("quit menu item was clicked");
                        app.exit(0);
                    }
                    _ => {
                        println!("menu item {:?} not handled", event.id);
                    }
                })
                .on_tray_icon_event(|tray, event| match event {
                    TrayIconEvent::Click { button, .. } => {
                        if button == tauri::tray::MouseButton::Left {
                            let app = tray.app_handle();
                            if let Some(window) = app.get_webview_window("float-ball") {
                                window.emit("open-main", ()).unwrap();
                            }
                        }
                    }
                    _ => {}
                })
                .build(app)?;

            Ok(())
        })
        .plugin(tauri_plugin_opener::init())
        .invoke_handler(tauri::generate_handler![])
        .run(tauri::generate_context!())
        .expect("error while running tauri application");
}
3. 运行和打包
安装依赖
npm install
开发模式
npm run tauri dev
构建应用
npm run tauri build -- --no-bundle
如需更换应用图标,替换图标文件后运行:
npm run tauri icon