springboot切换开发与生产环境配置文件
在springboot中切换开发与生产环境配置有多种方式,本文介绍自己在项目中的几种尝试。
1. 使用springboot的profile
首先在项目根目录的 pom.xml 文件中添加如下配置来指定profile的值:
<profiles>
    <profile>
        <id>dev</id>
        <properties>
            <profileActive>dev</profileActive>
        </properties>
    </profile>
    <profile>
        <id>prod</id>
        <properties>
            <profileActive>prod</profileActive>
        </properties>
    </profile>
</profiles>

然后在 `application.yml` 文件中使用 `@profileActive@` 来引用profile的值:

```yaml
# application.yml
spring:
  profiles:
    active: @profileActive@
在 application-dev.yml 和 application-prod.yml 文件中分别配置开发和生产环境的配置:
# application-dev.yml
spring:
  datasource:
    url: jdbc:mysql://localhost:3306/dev
    username: root
    password: root
# application-prod.yml
spring:
  datasource:
    url: jdbc:mysql://localhost:3306/pro
    username: root
    password: root
这样就可以通过 mvn clean package -P dev 和 mvn clean package -P prod 来打包不同环境的配置文件。如果使用 idea 开发工具,可以在右侧的 maven 面板中选择对应的 profile 来运行项目。
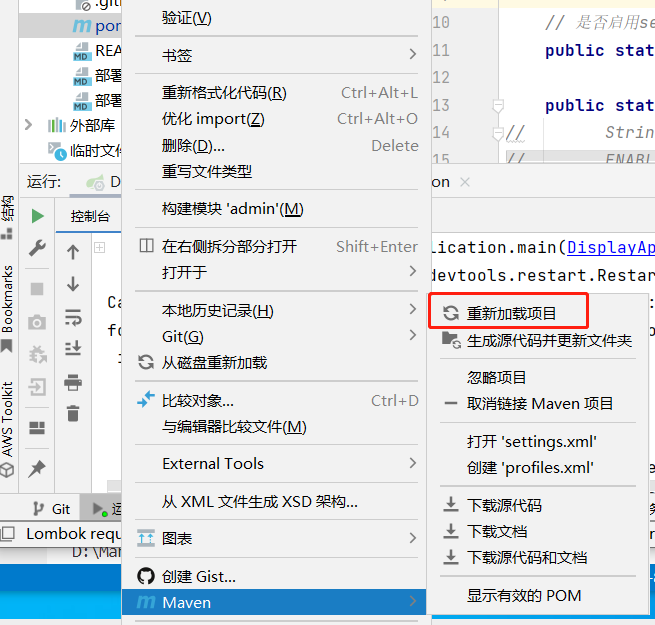
注意,每次切换或者添加新的 profile 都需要重新加载项目,否则会报错:
Caused by: org.yaml.snakeyaml.scanner.ScannerException: while scanning for the next token
found character '@' that cannot start any token. (Do not use @ for indentation)
 in 'reader', line 10, column 13:
        active: @profileActive@
                ^
在如下图中的位置重新加载项目:
2. 使用额外的配置文件
打包时不修改配置,而是在启动时指定配置文件,这样可以避免每次切换 profile 都需要重新加载项目。
java -jar xxx.jar --spring.config.additional-location=my-config.yml
3. 结合两种方式
在某次开发中遇到了这样的需求,就是甲方要求能够在执行时指定配置文件以便修改某些配置。而与此同时,当前项目有多个环境需要切换(开发环境、生产环境1、生产环境2),且在不同环境下,某些查询语句也需要有所变化。
如果直接结合两种方式,那么由于 profile 方式优先级更高,所以会导致指定配置文件的方式失效。
最后我采用的解决方式是将所有需要变更的配置都放到根目录的 pom.xml 文件中,然后在 application.yml 文件中引用这些配置。比如我下面的配置文件中,有三个环境分别用到了多个数据库的配置,这些配置都是在 pom.xml 文件中配置的。
<!-- pom.xml -->
<profiles>
<profile>
<id>dev</id>
<activation>
<activeByDefault>true</activeByDefault>
</activation>
<properties>
<profileActive>dev</profileActive>
<projectEnv>dev</projectEnv>
<spring.datasource.driver-class-name>org.mariadb.jdbc.Driver</spring.datasource.driver-class-name>
<spring.datasource.url>jdbc:mariadb://192.168.1.110:3306/honest_culture?useUnicode=true&characterEncoding=utf-8</spring.datasource.url>
<spring.datasource.username>root</spring.datasource.username>
<spring.datasource.password>root-password</spring.datasource.password>
<spring.data.neo4j.uri>bolt://192.168.1.110:7688</spring.data.neo4j.uri>
</properties>
</profile>
<profile>
<id>prod-mariadb</id>
<properties>
<profileActive>prod-mariadb</profileActive>
<projectEnv>prod</projectEnv>
<spring.datasource.driver-class-name>org.mariadb.jdbc.Driver</spring.datasource.driver-class-name>
<spring.datasource.url>jdbc:mariadb://localhost:3306/honest_culture?useUnicode=true&characterEncoding=utf-8</spring.datasource.url>
<spring.datasource.username>root</spring.datasource.username>
<spring.datasource.password>root-password</spring.datasource.password>
<spring.data.neo4j.uri>bolt://localhost:7688</spring.data.neo4j.uri>
</properties>
</profile>
<profile>
<id>prod-dm</id>
<properties>
<profileActive>prod-dm</profileActive>
<projectEnv>prod</projectEnv>
<spring.datasource.driver-class-name>dm.jdbc.driver.DmDriver</spring.datasource.driver-class-name>
<spring.datasource.url>jdbc:dm://localhost:5236?schema=""honest_culture""&clobAsString=1</spring.datasource.url>
<spring.datasource.username>SYSDBA</spring.datasource.username>
<spring.datasource.password>SYSDBA</spring.datasource.password>
<spring.data.neo4j.uri>bolt://localhost:7688</spring.data.neo4j.uri>
</properties>
</profile>
</profiles>
如果要使用这些配置,只需要在 application.yml 文件中引用即可:
spring:
  datasource:
    driver-class-name: @spring.datasource.driver-class-name@
    url: @spring.datasource.url@
    username: @spring.datasource.username@
    password: @spring.datasource.password@
  data:
    neo4j:
      uri: @spring.data.neo4j.uri@
      username: neo4j
      password: neo4j
  profiles:
    active: @profileActive@
然后由于上面环境切换了 mariadb 和达梦数据库,所以在查询语句中也需要有所变化,这时我通过@Profile注解来指定当prod-dm环境时使用DMSqlInterceptor拦截器。
// MybatisPlusConfig.java
package com.example.user.config;

import com.hc.display.interceptor.DMSqlInterceptor;
import org.apache.ibatis.session.SqlSessionFactory;
import org.springframework.beans.factory.annotation.Autowired;
import org.springframework.context.annotation.Configuration;
import org.springframework.context.annotation.Profile;

import javax.annotation.PostConstruct;
import java.util.List;

@Configuration
@Profile("prod-dm") // 仅在使用dm数据库时启用该拦截器
public class MybatisPlusConfig {

    private final List<SqlSessionFactory> sqlSessionFactoryList;

    @Autowired
    public MybatisPlusConfig(List<SqlSessionFactory> sqlSessionFactoryList) {
        this.sqlSessionFactoryList = sqlSessionFactoryList;
    }

    @PostConstruct
    public void addMySqlInterceptor() {
        DMSqlInterceptor interceptor = new DMSqlInterceptor();
        for (SqlSessionFactory sqlSessionFactory : sqlSessionFactoryList) {
            sqlSessionFactory.getConfiguration().addInterceptor(interceptor);
        }
    }

}
// DMSqlInterceptor.java
package com.example.user.interceptor;

import com.hc.common.utils.SqlUtils;
import org.apache.ibatis.executor.statement.StatementHandler;
import org.apache.ibatis.plugin.*;

import java.sql.Connection;
import java.sql.Statement;

import java.util.*;

@Intercepts({
        @Signature(type = StatementHandler.class, method = "prepare", args = {Connection.class, Integer.class}),
        @Signature(type = StatementHandler.class, method = "batch", args = {Statement.class}),
        @Signature(type = StatementHandler.class, method = "update", args = {Statement.class})
})
public class DMSqlInterceptor implements Interceptor {

    @Override
    public Object intercept(Invocation invocation) throws Throwable {
        // 获取 StatementHandler
        StatementHandler statementHandler = (StatementHandler) invocation.getTarget();
        // 获取原始的 SQL 语句
        String sql = statementHandler.getBoundSql().getSql();
        // 处理 SQL 语句
        String modifiedSql = SqlUtils.convertMySQLToDM(sql);

        // 通过反射修改 SQL
        java.lang.reflect.Field boundSqlField = statementHandler.getBoundSql().getClass().getDeclaredField("sql");
        boundSqlField.setAccessible(true);
        boundSqlField.set(statementHandler.getBoundSql(), modifiedSql);
        // 执行目标方法
        return invocation.proceed();
    }

    @Override
    public Object plugin(Object target) {
        // 使用 MyBatis 提供的 Plugin.wrap 方法生成代理对象
        return Plugin.wrap(target, this);
    }

    @Override
    public void setProperties(Properties properties) {
        // 可以在这里设置自定义属性
    }
}