Xposed模块DeviceInfo开发
1. 需求描述
本来是想开发一个用于伪造 wifi 和定位信息的用于打卡的 Xposed 模块。后面想逐步完善成一个伪造设备信息的模块,所以命名为 DeviceInfo。目前已实现功能:Wifi 信息伪造(已完成)、定位信息伪造(进行中)、其他尚未实现。
2. 开发环境
开发环境:Android Studio + Xposed 模块开发环境
3. 项目结构
src
  └─main
    ├─assets
    ├─java
    │  └─com
    │      └─example
    │          └─deviceinfo
    │              ├─adapter
    │              ├─config
    │              ├─content_provider
    │              ├─fragment
    │              │  └─config_editor
    │              │      ├─model
    │              │      └─ui
    │              ├─pojo
    │              └─util
    └─res
        ├─layout
        ├─values
        └─xml
4. 主要页面框架
4.1 主要页面设计
打算设计成这样的页面:
- 顶部:几个功能模块的 Tab(Wifi、定位、设备信息等)
- 其余部分:各个模块的设置页面
每个页面均为三列的表格,左侧是字段名,中间是当前值,右侧是伪造值。
最终完成的界面如图所示:
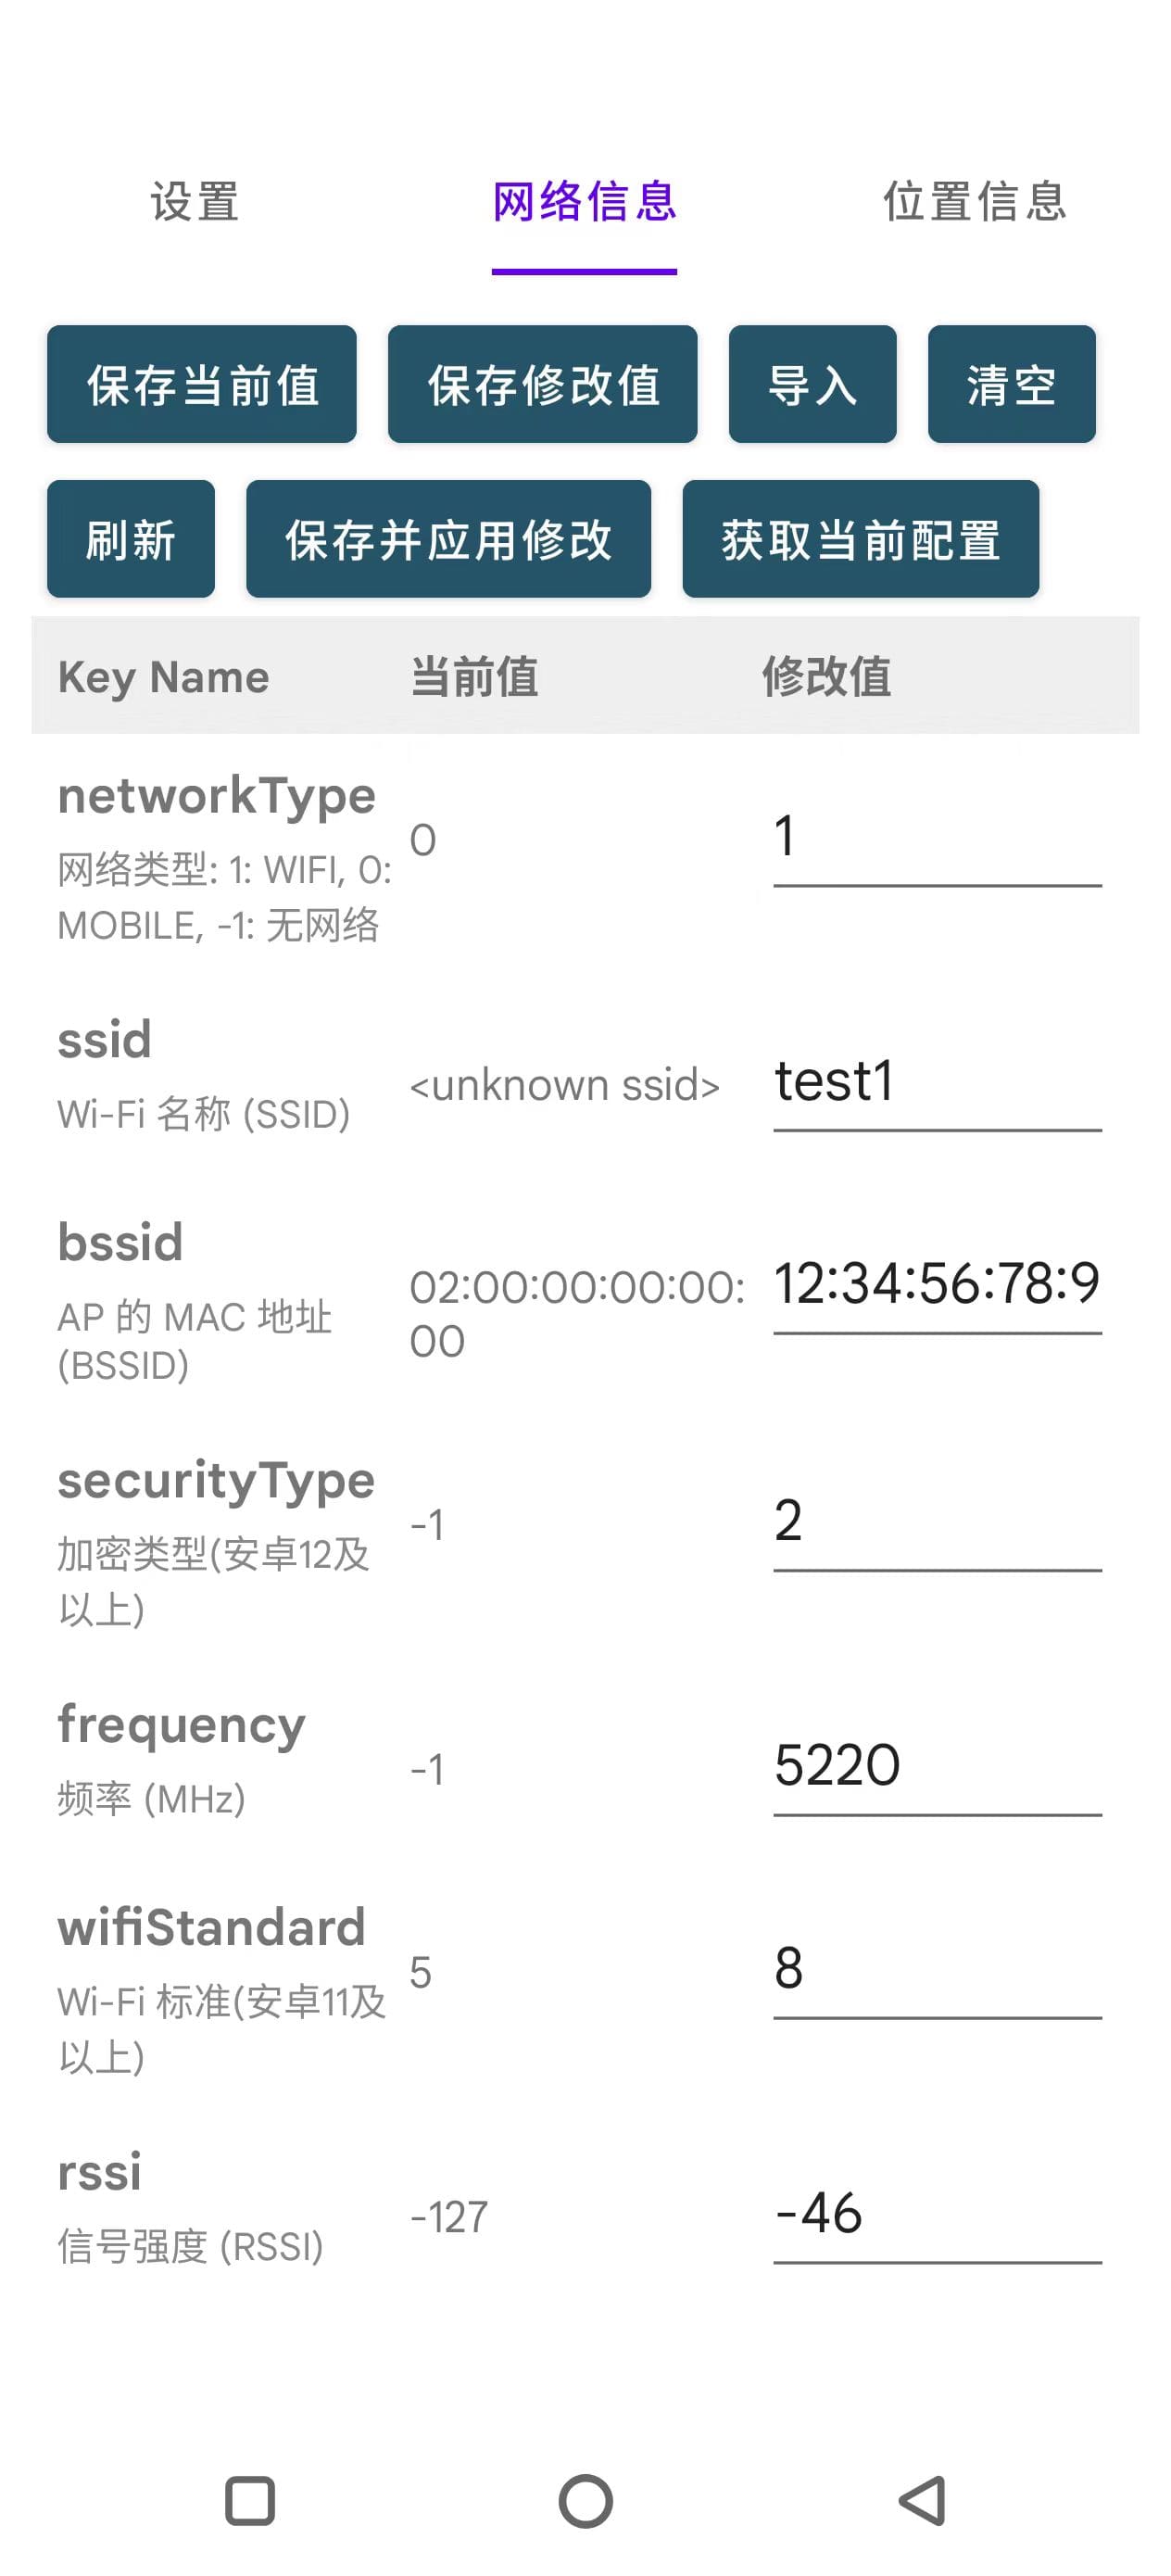
4.2. 页面实现
考虑到每个页面的布局是类似的,所以我打算使用 Fragment 来封装每个页面的布局。每个 Fragment 都包含一个 RecyclerView 用于显示三列的表格。
4.2.1. 数据模型
先创建一个基本数据模型,后续其他配置类均继承自该模型:
public abstract class BaseConfig implements Serializable {
    public String configId;
    public String configName;
    public long createdAt;
    public long updatedAt;

    public Map<String, Object> data = new HashMap<>();

    public abstract List<ConfigItem> getConfigItems();

    public abstract String getKeyOfDefaultName();

    public Class<?> getKeyType(String key) {
        for (ConfigItem item : getConfigItems()) {
            if (item.key.equals(key)) {
                return item.type;
            }
        }
        return null;
    }

    public String getDefaultConfigName() {
        String key = getKeyOfDefaultName();
        if (key == null || key.isEmpty()) {
            return null;
        }
        Object value = data.get(key);
        return value == null ? "" : String.valueOf(value);
    }

    public BaseConfig copy() {
    }

    public static BaseConfig newInstance(Class<? extends BaseConfig> cls) {
        try {
            return cls.newInstance();
        } catch (Exception e) {
            Log.e("BaseConfig", "Failed to create new instance", e);
            return null;
        }
    }

    public JSONObject toJsonObject() throws JSONException {
    }

    public static <T extends BaseConfig> T fromJsonObject(JSONObject obj, Class<T> cls) throws Exception {
    }

    public static class ConfigItem implements Serializable {
        public String key;
        public Class<?> type;
        public String description;

        public ConfigItem(String key, Class<?> type, String description) {
            this.key = key;
            this.type = type;
            this.description = description;
        }
    }
}
一开始我采用的方案是反射获取字段,也就是每个配置类定义一堆字段,然后通过反射获取字段名和字段值进行显示和修改。而 BaseConfig 则提供了通用的反射读写方法。后来写其他代码时反复创建示例以及反射操作十分繁琐,所以我改成了使用 Map 来存储字段名和字段值。这样每个配置类只需要定义字段的描述信息即可,读写时直接操作 Map 即可,代码复杂度大大减小。
数据主要存储在 data 字段中,key 为字段名,value 为字段值。每个子类需要实现 getConfigItems 方法返回该配置类的所有字段信息。
4.2.2. 列表适配器
中间的表格采用 RecyclerView 来实现,先定义每一行的显示布局 item_row.xml:
<?xml version="1.0" encoding="utf-8"?>
<LinearLayout xmlns:android="http://schemas.android.com/apk/res/android"
    xmlns:tools="http://schemas.android.com/tools"
    android:layout_width="match_parent"
    android:layout_height="wrap_content"
    android:orientation="horizontal"
    android:padding="8dp">

    <LinearLayout
        android:layout_width="0dp"
        android:layout_height="wrap_content"
        android:layout_weight="1"
        android:orientation="vertical">

        <TextView
            android:id="@+id/tvKey"
            android:layout_width="wrap_content"
            android:layout_height="wrap_content"
            android:textStyle="bold"
            android:textSize="16sp" />

        <TextView
            android:id="@+id/tvKeyDescription"
            android:layout_width="wrap_content"
            android:layout_height="wrap_content"
            android:textSize="12sp"
            android:textColor="#888888"
            android:paddingTop="2dp" />
    </LinearLayout>

    <TextView
        android:id="@+id/tvOriginalValue"
        android:layout_width="0dp"
        android:layout_height="wrap_content"
        android:layout_weight="1"/>

    <EditText
        android:id="@+id/etModifiedValue"
        android:importantForAutofill="no"
        android:layout_width="0dp"
        android:layout_height="wrap_content"
        android:layout_weight="1"
        android:inputType="text"
        tools:ignore="LabelFor" />
</LinearLayout>
实现 RecyclerView 适配器 ConfigAdapter:
public class ConfigTableAdapter extends RecyclerView.Adapter<ConfigTableAdapter.ViewHolder> {

    private BaseConfig originalObject;
    private BaseConfig updatedObject;
    private BaseConfig tempNewObject;
    private final List<ConfigItem> keyDescriptions;
    private final Map<String, String> modifiedValues = new HashMap<>();

    // 保存 ViewHolder,便于批量 UI 更新
    private final Map<String, ViewHolder> holderMap = new HashMap<>();

    public ConfigTableAdapter(BaseConfig originalObject) {
        this.originalObject = originalObject;
        this.keyDescriptions = originalObject.getConfigItems();
    }

    @NonNull
    @Override
    public ViewHolder onCreateViewHolder(@NonNull ViewGroup parent, int viewType) {
        View view = LayoutInflater.from(parent.getContext())
                .inflate(R.layout.item_row, parent, false);
        return new ViewHolder(view);
    }

    @Override
    public void onBindViewHolder(@NonNull ViewHolder holder, int position) {
        ConfigItem item = keyDescriptions.get(position);
        String key = item.key;

        // 第一列:键名和描述
        holder.tvKey.setText(key);
        holder.tvKeyDescription.setText(item.description);
        if (item.description != null && !item.description.isEmpty()) {
            holder.tvKeyDescription.setVisibility(View.VISIBLE);
        } else {
            holder.tvKeyDescription.setVisibility(View.GONE);
        }
        holderMap.put(key, holder);

        // 第二列:原始值
        Object value = originalObject.data.get(key);
        holder.tvOriginalValue.setText(value == null ? "" : String.valueOf(value));

        // 第三列:修改值
        Object modified = modifiedValues.get(key);
        holder.etModifiedValue.setText(modified == null ? "" : String.valueOf(modified));

        holder.etModifiedValue.addTextChangedListener(new android.text.TextWatcher() {
            @Override
            public void beforeTextChanged(CharSequence s, int start, int count, int after) {
            }

            @Override
            public void onTextChanged(CharSequence s, int start, int before, int count) {
            }

            @Override
            public void afterTextChanged(android.text.Editable s) {
                String newValueStr = s.toString();
                if (newValueStr.isEmpty()) {
                    modifiedValues.remove(key);
                } else {
                    modifiedValues.put(key, newValueStr);
                }
            }
        });

    }

    @Override
    public int getItemCount() {
        return keyDescriptions.size();
    }

    public static class ViewHolder extends RecyclerView.ViewHolder {
        TextView tvKey;
        TextView tvKeyDescription;
        TextView tvOriginalValue;
        EditText etModifiedValue;

        ViewHolder(@NonNull View itemView) {
            super(itemView);
            tvKey = itemView.findViewById(R.id.tvKey);
            tvKeyDescription = itemView.findViewById(R.id.tvKeyDescription);
            tvOriginalValue = itemView.findViewById(R.id.tvOriginalValue);
            etModifiedValue = itemView.findViewById(R.id.etModifiedValue);
        }
    }
}
4.2.3. Fragment 实现
先实现一个简单的框架:
public class ConfigEditorFragment extends Fragment {

    private static final String ARG_CONFIG = "config";

    private ConfigEditorController controller;

    private static Runnable refreshCallback = null;

    public static ConfigEditorFragment newInstance(BaseConfig config, Runnable refreshCallback) {
        Bundle b = new Bundle();
        b.putSerializable(ARG_CONFIG, config);

        ConfigEditorFragment f = new ConfigEditorFragment();
        f.setArguments(b);

        ConfigEditorFragment.refreshCallback = refreshCallback;
        return f;
    }

    @Override
    public View onCreateView(LayoutInflater i, ViewGroup c, Bundle b) {

        View v = i.inflate(R.layout.fragment_config_editor, c, false);

        // 添加全局点击事件:点击后关闭键盘并移除焦点
        v.setOnClickListener(view -> {
            UiUtils.hideKeyboardAndClearFocus(requireContext(), view);
        });

        Bundle args = getArguments();
        if (args == null) {
            throw new IllegalStateException("Arguments cannot be null");
        }
        BaseConfig config = (BaseConfig) args.getSerializable(ARG_CONFIG);
        if (config == null) {
            throw new IllegalStateException("Config cannot be null");
        }
        controller = new ConfigEditorController(requireContext(), v, config, refreshCallback);

        return v;
    }

}
这里使用了一个控制器类 ConfigEditorController 来处理具体的逻辑,以便于将业务逻辑和 UI 逻辑分离。这里需要处理的逻辑较多,主要有:
- 初始化 RecyclerView 列表
- 处理保存按钮点击事件
- 加载和保存配置数据
- 同步 UI 内容和变量
- 刷新等方法接口的实现、上下文在 Fragment 中传递
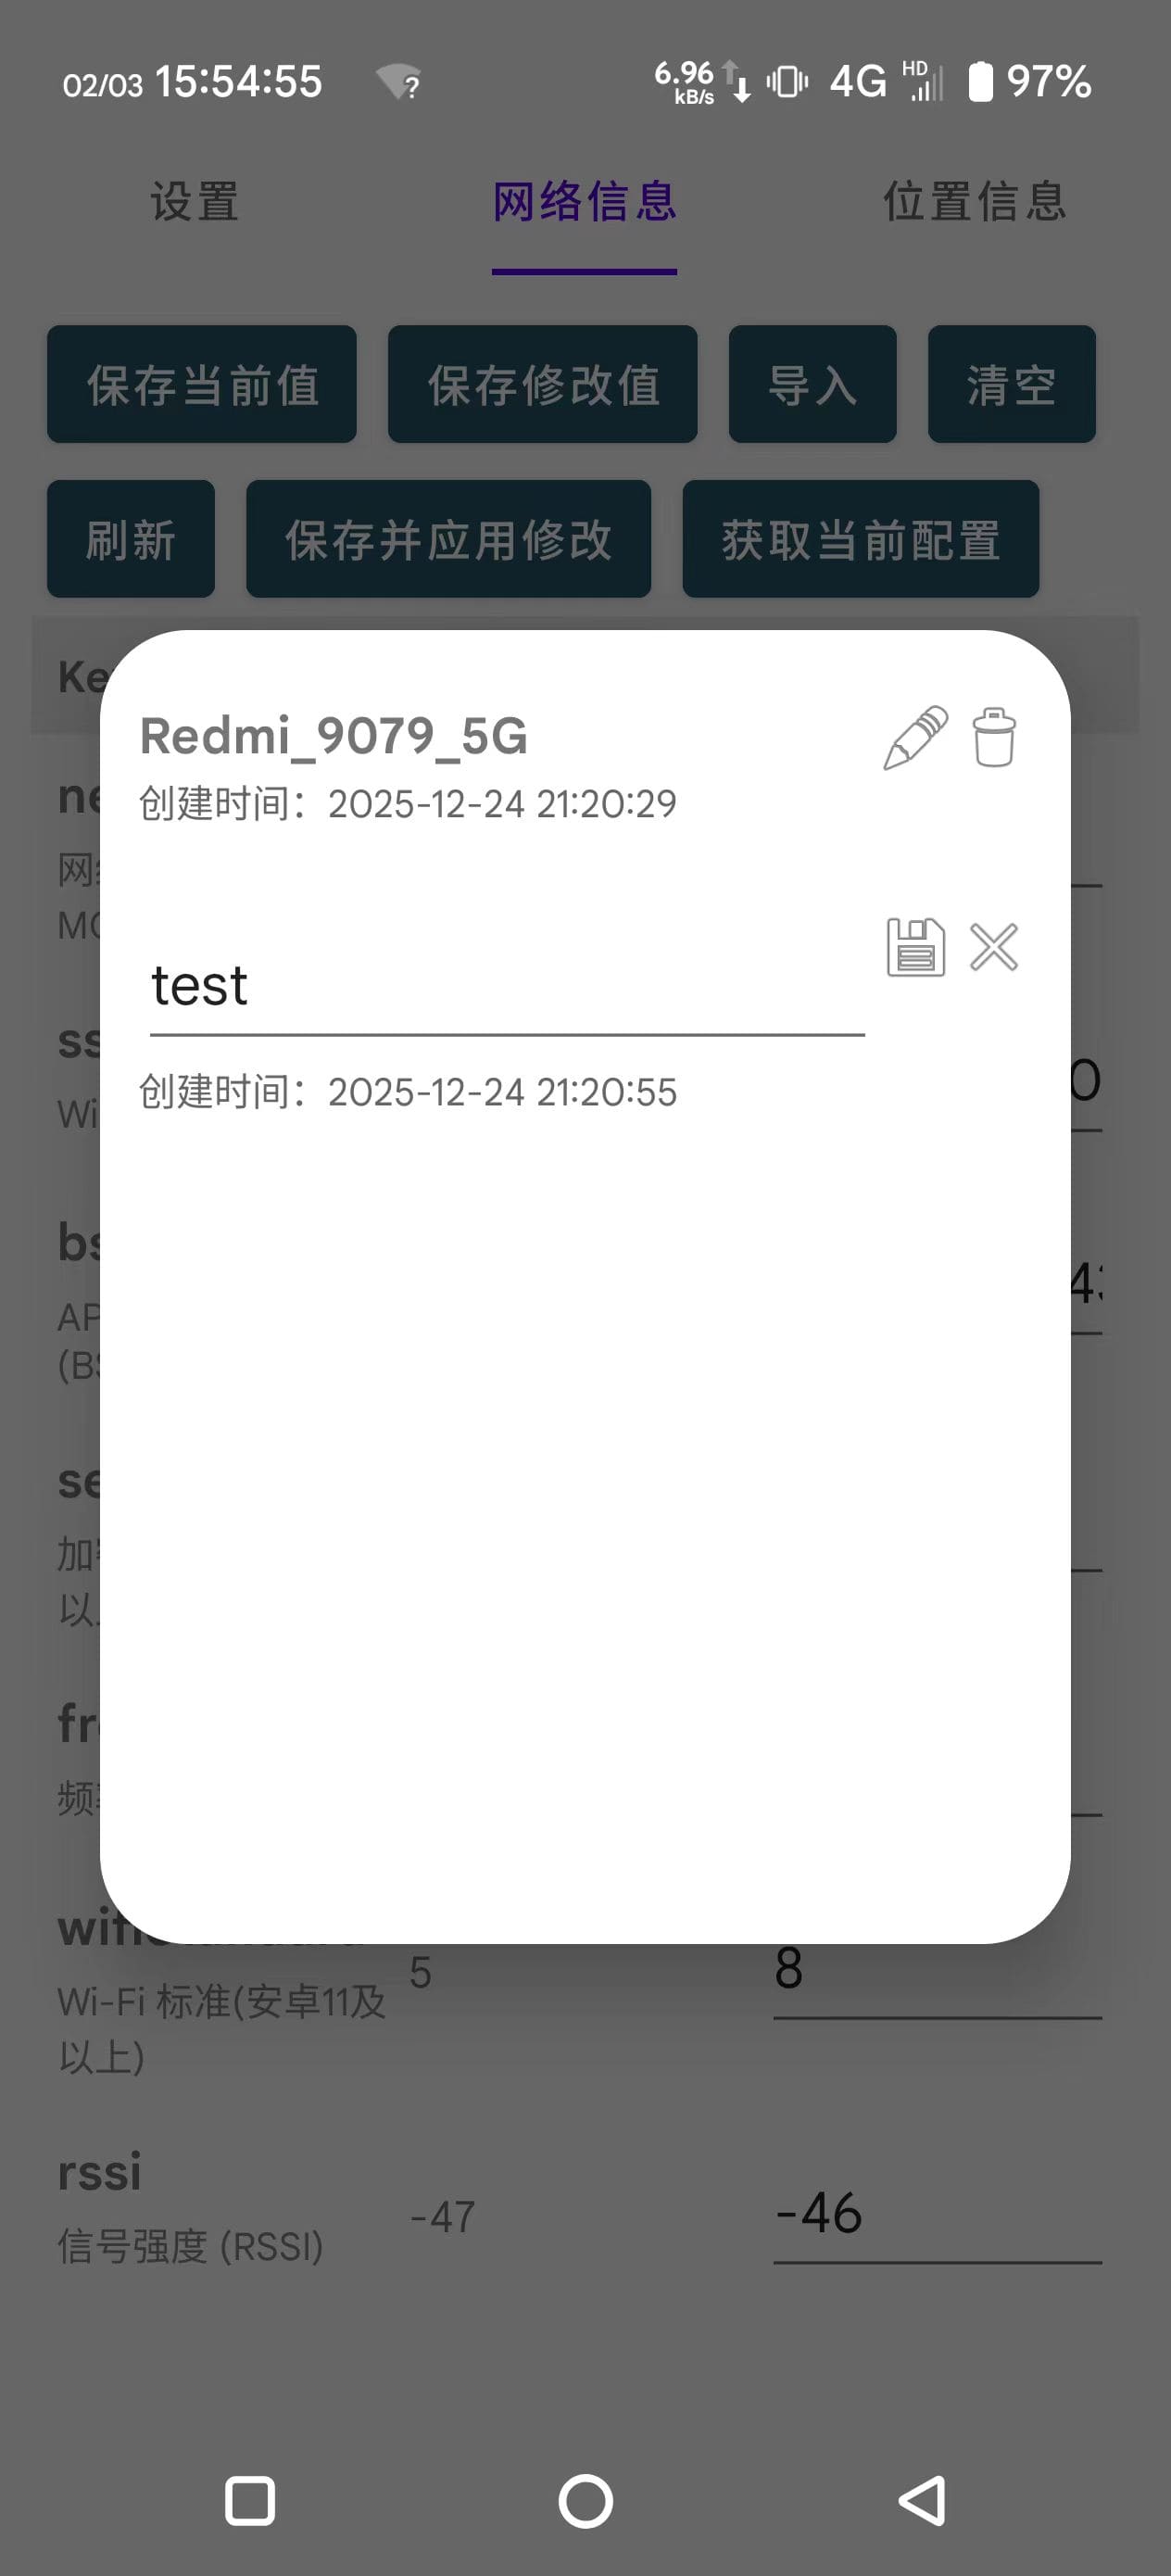
- 导入时弹出新的配置选择列表
以及其他一些细节的功能,实现过程较为繁琐,这里就不一一展开了。导入时弹出的新的配置选择列表新建了一个继承自android.app.Dialog的类 ConfigSelectDialog,用于显示可供选择的配置列表,用户选择后返回所选配置。代码可以参考 GitHub 仓库。下面是该对话框的界面截图:
4.2.4. 持久化
配置文件持久化保存在应用的私有存储空间内的 files 目录下。配置文件以 JSON 格式保存,使用 JSONObject 进行读写。
public class ConfigStorage {

    private static final String ROOT_DIR = "configs";
    private static final String CURRENT_CONFIG_FILE = "current_config.json";

    private static final Set<Character> illegalChars = Set.of('\\', '/', ':', '*', '?', '\"', '<', '>', '|', '\'');

    public static File getConfigDir(Context c, Class<?> cls) {
        File dir = new File(c.getFilesDir(), ROOT_DIR + "/" + cls.getSimpleName());
        if (!dir.exists()) dir.mkdirs();
        return dir;
    }

    public static void saveConfig(Context c, BaseConfig obj, boolean overwrite) throws Exception {
        if (obj.configName == null || obj.configName.isEmpty()) {
            throw new IllegalArgumentException("Config name cannot be empty");
        }
        if (!overwrite || obj.configId == null) {
            obj.configId = generateId();
            obj.createdAt = System.currentTimeMillis();
        }
        obj.updatedAt = System.currentTimeMillis();

        JSONObject root = obj.toJsonObject();
        createConfigFile(c, obj.getClass(), obj.configId, root);
    }

    public static void saveConfig(Context c, Class<?> cls, JSONObject obj, boolean overwrite) throws Exception {
        String configId = obj.getString("configId");
        String configName = obj.getString("configName");
        long now = System.currentTimeMillis();

        if (configName.isEmpty()) {
            throw new IllegalArgumentException("Config name cannot be empty");
        }
        if (!overwrite || configId.isEmpty()) {
            configId = generateId();
            obj.put("configId", configId);
            obj.put("createdAt", now);
        }
        obj.put("updatedAt", System.currentTimeMillis());
        createConfigFile(c, cls, configId, obj);
    }

    public static List<JSONObject> loadConfigList(Context c, Class<?> cls) {
        List<JSONObject> list = new ArrayList<>();
        File dir = getConfigDir(c, cls);
        for (File f : dir.listFiles()) {
            JSONObject obj = readJSONObject(f);
            if (obj != null) {
                list.add(obj);
            }
        }
        return list;
    }

    public static BaseConfig loadConfig(Context c, Class<? extends BaseConfig> cls, String id) {
        File dir = getConfigDir(c, cls);
        File file = new File(dir, id + ".json");
        JSONObject obj = readJSONObject(file);
        if (obj != null) {
            try {
                return BaseConfig.fromJsonObject(obj, cls);
            } catch (Exception e) {
                Log.e("ConfigStorage", "loadConfig: ", e);
            }
        }
        return null;
    }

    public static boolean configNameExists(Context c, Class<?> cls, String configName) {
        try {
            List<JSONObject> list = ConfigStorage.loadConfigList(c, cls);
            for (JSONObject obj : list) {
                if (configName.equals(obj.getString("configName"))) {
                    return true;
                }
            }
        } catch (Exception ignored) {
        }

        return false;
    }

    public static void deleteConfig(Context c, Class<?> cls, String id) {
        File dir = getConfigDir(c, cls);
        File file = new File(dir, id + ".json");
        if (file.exists()) {
            file.delete();
        }
    }

    public static String checkFileName(String name) {
        if (name == null || name.isEmpty()) {
            return "配置名称不能为空";
        }
        for (char c : name.toCharArray()) {
            if (illegalChars.contains(c)) {
                return "配置名称包含非法字符";
            }
        }
        if (name.length() > 100) {
            return "配置名称过长";
        }
        return null;
    }

    public static void applyCurrentConfig(Context c, Class<? extends BaseConfig> cls, String configId) throws Exception {
        File rootDir = new File(c.getFilesDir(), ROOT_DIR);
        if (!rootDir.exists()) rootDir.mkdirs();
        File file = new File(rootDir, CURRENT_CONFIG_FILE);
        JSONObject root = readJSONObject(file);
        if (root == null) {
            root = new JSONObject();
        }

        String key = cls.getSimpleName();

        root.put(key, Objects.requireNonNullElse(configId, JSONObject.NULL));

        FileWriter fw = new FileWriter(file);
        fw.write(root.toString(2));
        fw.close();
    }

    public static <T extends BaseConfig> T getCurrentConfig(Context c, Class<T> cls) throws Exception {
        File file = new File(c.getFilesDir(), ROOT_DIR + "/" + CURRENT_CONFIG_FILE);
        JSONObject root = readJSONObject(file);
        if (root == null) {
            return null;
        }
        String key = cls.getSimpleName();
        if (!root.has(key) || root.isNull(key)) {
            return null;
        }

        String configId = root.getString(key);
        File configFile = new File(getConfigDir(c, cls), configId + ".json");
        JSONObject obj = readJSONObject(configFile);
        if (obj == null) {
            return null;
        }

        return BaseConfig.fromJsonObject(obj, cls);
    }

    private static void createConfigFile(Context c, Class<?> cls, String id, JSONObject obj) throws Exception {
        File file = new File(getConfigDir(c, cls), id + ".json");
        FileWriter fw = new FileWriter(file);
        fw.write(obj.toString(2));
        fw.close();
    }

    private static String generateId() {
        // 使用时间戳 + 随机数生成唯一ID
        int randomPart = (int) (Math.random() * 100000);
        return System.currentTimeMillis() + "-" + randomPart;
    }


    private static JSONObject readJSONObject(File f) {
        if (!f.exists()) {
            return null;
        }
        try {
            String json = new String(Files.readAllBytes(f.toPath()));
            return new JSONObject(json);
        } catch (Exception e) {
            Log.e("ConfigStorage", "readJSONObject: ", e);
            return null;
        }
    }
}
存储方式比较简单,直接将每个配置对象序列化为 JSON 格式保存为单独的文件,文件名为配置 ID 加 .json 后缀。配置文件保存在应用的私有存储空间内的 files/configs/配置类名/ 目录下。而当前使用的配置 ID 则保存在 files/configs/current_config.json 文件中,以便每次启动时加载和 Xposed 模块注入时使用。
5. 各模块设计
5.1. Wifi模块设计
首先是继承自 BaseConfig 的 WifiData 类,用于存储 Wifi 相关的信息:
public class WifiData extends BaseConfig implements Serializable {

    public static List<ConfigItem> keyDescriptions = List.of(
            new ConfigItem("networkType", Integer.class, "网络类型: 1: WIFI, 0: MOBILE, -1: 无网络"),
            new ConfigItem("ssid", String.class, "Wi-Fi 名称 (SSID)"),
            new ConfigItem("bssid", String.class, "AP 的 MAC 地址 (BSSID)"),
            new ConfigItem("securityType", Integer.class, "加密类型(安卓12及以上)"),
            new ConfigItem("frequency", Integer.class, "频率 (MHz)"),
            new ConfigItem("wifiStandard", Integer.class, "Wi-Fi 标准(安卓11及以上)"),
            new ConfigItem("rssi", Integer.class, "信号强度 (RSSI)")
    );

    public static final String KEY_OF_DEFAULT_NAME = "ssid";

    @Override
    public List<ConfigItem> getConfigItems() {
        return keyDescriptions;
    }

    @Override
    public String getKeyOfDefaultName() {
        return KEY_OF_DEFAULT_NAME;
    }


    public static WifiData fromWifiInfo(WifiInfo wifiInfo, int networkType) {
        WifiData wifiData = new WifiData();
        wifiData.data.put("networkType", networkType);
        String ssid = wifiInfo.getSSID();
        // wifi info 返回的 ssid 有时会带引号,需要去掉
        if (ssid != null && ssid.length() >= 2 && ssid.startsWith("\"") && ssid.endsWith("\"")) {
            ssid = ssid.substring(1, ssid.length() - 1);
        }
        wifiData.data.put("ssid", ssid);
        wifiData.data.put("bssid", wifiInfo.getBSSID());
        wifiData.data.put("frequency", wifiInfo.getFrequency());
        wifiData.data.put("rssi", wifiInfo.getRssi());
        if (Build.VERSION.SDK_INT >= Build.VERSION_CODES.S) {
            // 安卓12 及以上
            wifiData.data.put("securityType", wifiInfo.getCurrentSecurityType());
        }
        if (Build.VERSION.SDK_INT >= Build.VERSION_CODES.R) {
            // 安卓11 及以上
            wifiData.data.put("wifiStandard", wifiInfo.getWifiStandard());
        }
        return wifiData;
    }
}
获取方式目前使用的方法比较简单,网络类型使用 ConnectivityManager.getActiveNetworkInfo() 获取,Wifi 信息使用 WifiManager.getConnectionInfo() 获取。后续可以考虑使用更复杂的方式获取,比如从扫描结果中获取等。而存储的内容则基本是所有 android.net.wifi.WifiInfo 对象可以直接用get方法拿到的所有值。加载网络和 Wifi 信息的代码如下:
    private void loadNetworkInfo() {
        NetworkInfo info = connectivityManager.getActiveNetworkInfo();
        Integer type = (info != null) ? info.getType() : null;
        // 1: WIFI, 0: MOBILE, null: 无网络
        Log.d("WifiFragment", "Active Network Type: " + type);
        WifiInfo wifiInfo = wifiManager.getConnectionInfo();
        WifiData data = WifiData.fromWifiInfo(wifiInfo, type == null ? -1 : type);
        if (wifiConfigFragment != null) {
            wifiConfigFragment.setTargetConfig(data);
        }
    }
5.2. 定位模块设计
定位模块的设计思路和 Wifi 模块类似,先定义一个 LocationData 类继承自 BaseConfig,用于存储定位相关的信息。然后在定位模块的 Fragment 中加载当前的位置信息并显示在界面上。定位信息的获取可以使用 LocationManager 或 FusedLocationProviderClient 等方式获取当前位置信息。存储的内容则是 android.location.Location 对象可以直接用 get 方法拿到的所有值。LocationData 类的实现如下:
public class LocationData extends BaseConfig implements Serializable {

    public static List<ConfigItem> keyDescriptions = List.of(
            new ConfigItem("latitude", Double.class, "纬度"),
            new ConfigItem("longitude", Double.class, "经度"),
            new ConfigItem("horizontalAccuracy", Float.class, "水平精度,误差范围(米)"),
            new ConfigItem("altitude", Double.class, "GPS原始高度,WGS84(米)"),
            new ConfigItem("verticalAccuracy", Float.class, "垂直方向的误差范围(米)"),
            new ConfigItem("mslAltitude", Double.class, "相对于平均海平面的高度(米)(Android 14+)"),
            new ConfigItem("mslAltitudeAccuracy", Float.class, "mslAltitude的误差范围(米)(Android 14+)"),
            new ConfigItem("speed", Float.class, "速度(米/秒)"),
            new ConfigItem("speedAccuracy", Float.class, "speed的误差范围(米/秒)"),
            new ConfigItem("bearing", Float.class, "方位角,正北方向顺时针计(度)"),
            new ConfigItem("bearingAccuracy", Float.class, "bearing的误差范围(度)"),
            new ConfigItem("isMock", Boolean.class, "是否为模拟位置"),
            new ConfigItem("elapsedRealtimeMillis", Long.class, "位置被测量时的系统运行时间(毫秒)(Android 13+)")
    );

    @Override
    public List<ConfigItem> getConfigItems() {
        return keyDescriptions;
    }

    @Override
    public String getKeyOfDefaultName() {
        return null;
    }

    public static LocationData fromLocation(Location location) {
        LocationData obj = new LocationData();
        Map<String, Object> map = obj.data;
        map.put("latitude", location.getLatitude());
        map.put("longitude", location.getLongitude());
        if (location.hasAccuracy()) {
            map.put("horizontalAccuracy", location.getAccuracy());
        }
        if (location.hasAltitude()) {
            map.put("altitude", location.getAltitude());
            if (location.hasVerticalAccuracy()) {
                map.put("verticalAccuracy", location.getVerticalAccuracyMeters());
            }
        }
        if (Build.VERSION.SDK_INT >= Build.VERSION_CODES.UPSIDE_DOWN_CAKE) {
            // Android 14+
            if (location.hasMslAltitude()) {
                obj.data.put("mslAltitude", location.getMslAltitudeMeters());
                if (location.hasMslAltitudeAccuracy()) {
                    obj.data.put("mslAltitudeAccuracy", location.getMslAltitudeAccuracyMeters());
                }
            }
        }
        if (location.hasSpeed()) {
            map.put("speed", location.getSpeed());
            if (location.hasSpeedAccuracy()) {
                map.put("speedAccuracy", location.getSpeedAccuracyMetersPerSecond());
            }
        }
        if (location.hasBearing()) {
            map.put("bearing", location.getBearing());
            if (location.hasBearingAccuracy()) {
                map.put("bearingAccuracy", location.getBearingAccuracyDegrees());
            }
        }
        map.put("isMock", location.isFromMockProvider());
        if (Build.VERSION.SDK_INT >= Build.VERSION_CODES.TIRAMISU) {
            // Android 13+
            map.put("elapsedRealtimeMillis", location.getElapsedRealtimeMillis());
        }
        return obj;
    }
}
获取定位信息参考了:https://developer.aliyun.com/article/1308376
public class LocationFragment extends Fragment {

    private LocationManager locationManager;
    private Context context;

    public final String LOCATION_FRAGMENT_TAG = "location_fragment";

    private ConfigEditorFragment locationConfigFragment = null;

    private boolean isRequestingLocation = false;

    @Override
    public View onCreateView(LayoutInflater inflater, ViewGroup container, Bundle savedInstanceState) {
        View rootView = inflater.inflate(R.layout.fragment_location_page, container, false);
        context = requireContext();

        locationManager = (LocationManager) context.getSystemService(Context.LOCATION_SERVICE);

        FragmentTransaction ft = getChildFragmentManager().beginTransaction();
        locationConfigFragment = ConfigEditorFragment.newInstance(new LocationData(), this::loadLocationInfo);
        ft.replace(R.id.location_fragment_container, locationConfigFragment, LOCATION_FRAGMENT_TAG);
        ft.commit();

        rootView.findViewById(R.id.btnOpenMap).setOnClickListener(v -> UiUtils.toast(context, "功能开发中,敬请期待!"));

        return rootView;
    }

    @Override
    public void onViewCreated(@NonNull View view, @Nullable Bundle savedInstanceState) {
        super.onViewCreated(view, savedInstanceState);
        view.post(this::getLastKnownLocation);
        view.post(locationConfigFragment::getCurrentConfig);
    }

    private void getLastKnownLocation() {
        if (ActivityCompat.checkSelfPermission(context, android.Manifest.permission.ACCESS_FINE_LOCATION)
                != PackageManager.PERMISSION_GRANTED
                && ActivityCompat.checkSelfPermission(context, Manifest.permission.ACCESS_COARSE_LOCATION)
                != PackageManager.PERMISSION_GRANTED) {
            UiUtils.toast(context, "无定位权限,无法获取位置信息");
            return;
        }
        Location last = locationManager.getLastKnownLocation(LocationManager.GPS_PROVIDER);
        if (last != null) {
            LocationData locationData = LocationData.fromLocation(last);
            locationConfigFragment.setTargetConfig(locationData);
        }
    }

    private void loadLocationInfo() {
        if (isRequestingLocation) {
            return;
        }
        if (ActivityCompat.checkSelfPermission(context, android.Manifest.permission.ACCESS_FINE_LOCATION)
                != PackageManager.PERMISSION_GRANTED
                && ActivityCompat.checkSelfPermission(context, Manifest.permission.ACCESS_COARSE_LOCATION)
                != PackageManager.PERMISSION_GRANTED) {
            UiUtils.toast(context, "无定位权限,无法获取位置信息");
            return;
        }
        LocationListener listener = new LocationListener() {
            @Override
            public void onLocationChanged(@NonNull Location location) {
                // 拿到最新位置
                LocationData locationData = LocationData.fromLocation(location);
                locationConfigFragment.setTargetConfig(locationData);
                // 用完立刻停止定位
                locationManager.removeUpdates(this);
                isRequestingLocation = false;
                UiUtils.toast(context, "位置信息已更新");
            }
        };
        locationManager.requestLocationUpdates(
                LocationManager.GPS_PROVIDER,
                0,
                0,
                listener
        );
        isRequestingLocation = true;
        UiUtils.toast(context, "正在获取定位");
    }

}
我没有使用上面网站里提到的监听方式:
locationManager.requestLocationUpdates(
                LocationManager.GPS_PROVIDER,//指定GPS定位的提供者
                1000,//间隔时间
                1,//位置更新之间的最小距离
                new LocationListener() { //监听GPS定位信息是否改变
                    @Override
                    public void onLocationChanged(@NonNull Location location) { //GPS信息发生改变时回调
                    }
                }
        );
因为这种方式一直监听位置变化,比较耗电,而且我只需要获取一次最新位置即可。所以改成了上面的方式,初始化和点击按钮时再获取一次最新位置,拿到后立刻停止监听。
6. 添加 Xposed 注入代码
6.1. 配置 Xposed 环境
- 在根目录的 settings.gradle 文件中添加 Xposed 仓库:
dependencyResolutionManagement { repositoriesMode.set(RepositoriesMode.FAIL_ON_PROJECT_REPOS) repositories { google() mavenCentral() maven { url 'https://api.xposed.info/' } } } -
在 app 模块的 build.gradle 文件中添加 Xposed 依赖: ```gradle dependencies { compileOnly ‘de.robv.android.xposed:api:82’ }
- 在 AndroidManifest.xml 中添加 Xposed 模块声明:
     <meta-data
         android:name="xposedmodule"
         android:value="true"/>

     <meta-data
         android:name="xposeddescription"
         android:value="@string/xposed_description"/>

     <meta-data
         android:name="xposedminversion"
         android:value="54"/>

     <meta-data
         android:name="xposedscope"
         android:resource="@array/xposedscope"/>
xposedscope 定义了模块可以注入的应用范围。
- 在 assets 目录下创建 xposed_init 文件,内容为模块的入口类全名:
com.example.deviceinfo.MainHook
6.2. 编写 Xposed 注入代码
由于我没有 Xposed 的开发经验,安卓开发经验也不多,基本依靠能找到的有限的资料以及 AI 辅助完成了注入代码的编写。
6.2.1. 数据共享探索
对我来说比较困难的地方在于数据共享,由于 Xposed 模块是注入到其他应用进程中的,而配置数据保存在模块应用的私有存储空间内,所以不能直接访问配置文件。
在旧版本安卓有使用 Xposed 提供的 XSharedPreferences 类来实现跨进程数据共享的方式:
// 在应用进程中
sharedPreferences = context.getSharedPreferences(prefName, Context.MODE_WORLD_READABLE)

// 在 Xposed 模块中
XSharedPreferences xSharedPreferences = new XSharedPreferences("com.example.deviceinfo", "config_prefs");
但在较新版本里,MODE_WORLD_READABLE 已被废弃无法使用。
我在网上找到了一个新的方式:New XSharedPreference https://github.com/LSPosed/LSPosed/wiki/New-XSharedPreferences
这种方式需要在 AndroidManifest.xml 中将 xposedminversion 设置为 93 及以上版本,这种情况下,如果模块被激活,MODE_WORLD_READABLE就不会报错了。
但是在我实际使用过程中,XSharedPreferences 获取到的对象总是 null,无法读取到数据。各个地方的代码都和官方 demo 以及网上其他资料一致,不知道是什么原因导致的。
最终我打算使用 ContentProvider 来实现数据共享。ContentProvider 是安卓提供的跨进程数据共享机制,可以通过 URI 访问其他应用的数据。模块应用中创建一个 ContentProvider 用于提供配置数据的访问接口,Xposed 模块通过 ContentResolver 访问该 ContentProvider 获取配置数据。
public class ConfigProvider extends ContentProvider {

    private static final Map<String, Class<? extends BaseConfig>> configClassMap = Map.of(
            WifiData.class.getSimpleName(), WifiData.class,
            LocationData.class.getSimpleName(), LocationData.class
    );

    @Override
    public boolean onCreate() {
        return true;
    }

    @Override
    public Bundle call(@NonNull String method, String arg, Bundle extras) {
        if (!ProviderConstants.METHOD_GET_CURRENT_CONFIG.equals(method)) {
            return null;
        }
        if (extras == null) return null;

        String className = extras.getString(ProviderConstants.EXTRA_CLASS_NAME);
        if (className == null) return null;

        Class<? extends BaseConfig> cls = configClassMap.get(className);
        if (cls == null) {
            return null;
        }

        Context context = getContext();
        if (context == null) return null;

        try {
            BaseConfig config = ConfigStorage.getCurrentConfig(context, cls);
            if (config == null) return null;

            Bundle bundle = new Bundle();

            for (Map.Entry<String, Object> e : config.data.entrySet()) {
                Object v = e.getValue();
                String k = e.getKey();

                if (v instanceof String) {
                    bundle.putString(k, (String) v);
                } else if (v instanceof Integer) {
                    bundle.putInt(k, (Integer) v);
                } else if (v instanceof Boolean) {
                    bundle.putBoolean(k, (Boolean) v);
                } else if (v instanceof Long) {
                    bundle.putLong(k, (Long) v);
                } else if (v instanceof Float) {
                    bundle.putFloat(k, (Float) v);
                } else if (v instanceof Double) {
                    bundle.putDouble(k, (Double) v);
                }
            }
            return bundle;

        } catch (Exception e) {
            Log.e("ConfigProvider", "getCurrentConfig failed", e);
            return null;
        }
    }

    @Override
    public Cursor query(@NonNull Uri uri, String[] projection, String selection, String[] selectionArgs, String sortOrder) {
        return null;
    }

    @Override
    public String getType(@NonNull Uri uri) {
        return null;
    }

    @Override
    public Uri insert(@NonNull Uri uri, ContentValues values) {
        return null;
    }

    @Override
    public int delete(@NonNull Uri uri, String s, String[] as) {
        return 0;
    }

    @Override
    public int update(@NonNull Uri uri, ContentValues v, String s, String[] as) {
        return 0;
    }
}
然后在 AndroidManifest.xml 中注册该 ContentProvider:
    <provider
        android:name=".content_provider.ConfigProvider"
        android:authorities="com.example.deviceinfo.configprovider"
        android:exported="true"
        android:grantUriPermissions="true" />
在 MainHook.java 中通过 ContentResolver 访问该 ContentProvider 获取配置数据:
    private static final String PACKAGE_NAME = "com.example.deviceinfo";

    private Bundle getDataFromProvider(Context context, String className) {
        Uri uri = Uri.parse("content://" + PACKAGE_NAME + ".configprovider");
        Bundle extras = new Bundle();
        extras.putString(ProviderConstants.EXTRA_CLASS_NAME, className);
        try {
            return context.getContentResolver()
                    .call(uri, ProviderConstants.METHOD_GET_CURRENT_CONFIG, null, extras);
        } catch (Throwable t) {
            XposedBridge.log("Error calling content provider: " + t.getMessage());
            return null;
        }
    }
所需的 Context 对象可以通过 hook Application.attach() 方法获取。
        XposedHelpers.findAndHookMethod(
                Application.class,
                "attach",
                Context.class,
                new XC_MethodHook() {
                    @Override
                    protected void afterHookedMethod(MethodHookParam param) {
                        Context context = (Context) param.args[0];
                        Context providerContext;
                        try {
                            providerContext = context.createPackageContext(
                                    "com.example.deviceinfo",
                                    Context.CONTEXT_IGNORE_SECURITY | Context.CONTEXT_INCLUDE_CODE
                            );
                        } catch (Exception e) {
                            XposedBridge.log("Failed to create provider context: " + e.getMessage());
                            return;
                        }
                        XposedBridge.log("Context acquired: " + providerContext);
                    }
                }
        );
6.2.2. 注入 Wifi 和定位信息
    @Override
    public void handleLoadPackage(final XC_LoadPackage.LoadPackageParam lpparam) {
        if (lpparam.packageName.equals(PACKAGE_NAME)) {
            return;
        }

        XposedHelpers.findAndHookMethod(
                Application.class,
                "attach",
                Context.class,
                new XC_MethodHook() {
                    @Override
                    protected void afterHookedMethod(MethodHookParam param) {
                        Context context = (Context) param.args[0];
                        Context providerContext;
                        try {
                            providerContext = context.createPackageContext(
                                    "com.example.deviceinfo",
                                    Context.CONTEXT_IGNORE_SECURITY | Context.CONTEXT_INCLUDE_CODE
                            );
                        } catch (Exception e) {
                            XposedBridge.log("Failed to create provider context: " + e.getMessage());
                            return;
                        }
                        XposedBridge.log("Context acquired: " + providerContext);

                        hookNetwork(lpparam, providerContext);
                        hookLocation(lpparam, providerContext);
                    }
                }
        );
    }

    private void hookNetwork(XC_LoadPackage.LoadPackageParam lpparam, Context context) {
        Bundle bundle = getDataFromProvider(context, "WifiData");
        if (bundle == null) {
            return;
        }
        // 1. 网络类型
        int networkType = bundle.getInt("networkType", -1);
        XposedHelpers.findAndHookMethod("android.net.NetworkInfo", lpparam.classLoader,
                "getType", new XC_MethodHook() {
                    @Override
                    protected void beforeHookedMethod(MethodHookParam param) {
                        if (networkType == -1) {
                            param.setResult(null);
                        } else if (networkType == ConnectivityManager.TYPE_MOBILE || networkType == ConnectivityManager.TYPE_WIFI) {
                            param.setResult(networkType);
                        }
                    }
                });
        // TODO: NetworkInfo.getTypeName, NetworkInfo.getSubType
        if (networkType == -1) {
            XposedHelpers.findAndHookMethod("android.net.ConnectivityManager", lpparam.classLoader,
                    "getNetworkCapabilities", new XC_MethodHook() {
                        @Override
                        protected void beforeHookedMethod(MethodHookParam param) {
                            param.setResult(null);
                        }
                    });
            return;
        }
        XposedHelpers.findAndHookMethod(
                "android.net.NetworkCapabilities", lpparam.classLoader,
                "hasTransport", int.class, new XC_MethodHook() {
                    @Override
                    protected void beforeHookedMethod(MethodHookParam param) {
                        int transportType = (int) param.args[0];
                        if (networkType == ConnectivityManager.TYPE_WIFI && transportType == NetworkCapabilities.TRANSPORT_WIFI) {
                            param.setResult(true);
                        } else if (networkType == ConnectivityManager.TYPE_MOBILE && transportType == NetworkCapabilities.TRANSPORT_CELLULAR) {
                            param.setResult(true);
                        } else {
                            param.setResult(false);
                        }
                    }
                });
        if (networkType != ConnectivityManager.TYPE_WIFI) {
            return;
        }

        XposedHelpers.findAndHookMethod("android.net.wifi.WifiInfo", lpparam.classLoader,
                "getSSID", new XC_MethodHook() {
                    @Override
                    protected void afterHookedMethod(MethodHookParam param) {
                        String ssid = bundle.getString("ssid", null);
                        if (ssid != null) {
                            param.setResult("\"" + ssid + "\"");
                        }
                    }
                });

        hookMethodOfString(bundle, lpparam, "android.net.wifi.WifiInfo", "getBSSID", "bssid");

        hookMethodOfInt(bundle, lpparam, "android.net.wifi.WifiInfo", "getFrequency", "frequency");

        hookMethodOfInt(bundle, lpparam, "android.net.wifi.WifiInfo", "getRssi", "rssi");

        if (Build.VERSION.SDK_INT >= Build.VERSION_CODES.S) {
            hookMethodOfInt(bundle, lpparam, "android.net.wifi.WifiInfo", "getCurrentSecurityType", "securityType");
        }

        if (Build.VERSION.SDK_INT >= Build.VERSION_CODES.R) {
            hookMethodOfInt(bundle, lpparam, "android.net.wifi.WifiInfo", "getWifiStandard", "wifiStandard");
        }

        // TODO: Hook ScanResult

    }

    private void hookLocation(XC_LoadPackage.LoadPackageParam lpparam, Context context) {
        Bundle bundle = getDataFromProvider(context, "LocationData");
        if (bundle == null) {
            return;
        }

        hookMethodOfDouble(bundle, lpparam, "android.location.Location", "getLatitude", "latitude");
        hookMethodOfDouble(bundle, lpparam, "android.location.Location", "getLongitude", "longitude");
        hookMethodOfFloat(bundle, lpparam, "android.location.Location", "getAccuracy", "horizontalAccuracy");
        hookMethodOfDouble(bundle, lpparam, "android.location.Location", "getAltitude", "altitude");
        hookMethodOfFloat(bundle, lpparam, "android.location.Location", "getVerticalAccuracyMeters", "verticalAccuracy");
        if (Build.VERSION.SDK_INT >= Build.VERSION_CODES.UPSIDE_DOWN_CAKE) {
            hookMethodOfDouble(bundle, lpparam, "android.location.Location", "getMslAltitudeMeters", "mslAltitude");
            hookMethodOfFloat(bundle, lpparam, "android.location.Location", "getMslAltitudeAccuracyMeters", "mslAltitudeAccuracy");
        }
        hookMethodOfFloat(bundle, lpparam, "android.location.Location", "getSpeed", "speed");
        hookMethodOfFloat(bundle, lpparam, "android.location.Location", "getSpeedAccuracyMetersPerSecond", "speedAccuracy");
        hookMethodOfFloat(bundle, lpparam, "android.location.Location", "getBearing", "bearing");
        hookMethodOfFloat(bundle, lpparam, "android.location.Location", "getBearingAccuracyDegrees", "bearingAccuracy");

        // Hook 其他方法...
    }

    private void hookMethodOfString(Bundle bundle, XC_LoadPackage.LoadPackageParam lpparam, String className, String methodName, String key) {
        XposedHelpers.findAndHookMethod(className, lpparam.classLoader,
                methodName, new XC_MethodHook() {
                    @Override
                    protected void afterHookedMethod(MethodHookParam param) {
                        String val = bundle.getString(key, null);
                        if (val != null) {
                            param.setResult(val);
                        }
                    }
                });
    }

    private void hookMethodOfInt(...) { /* 类似上面的 hookMethodOfString */ }
    private void hookMethodOfDouble(...) { /* 类似上面的 hookMethodOfString */ }
    private void hookMethodOfFloat(...) { /* 类似上面的 hookMethodOfString */ }
目前 Hook 的内容比较草率,Wifi 方面只是简单地 Hook 了 WifiInfo 的几个方法,不过足够应付某些 app 比如飞书的 wifi 打卡,比如老版本 QQ 8.2.11 无法在移动网络下使用的问题。定位方面我一开始以为只要 Hook Location 的 get 方法就行了,后来发现实际上很多 app 都不会从 Location 对象里获取数据,而是用一些第三方 SDK 来获取位置,这些目前我都没有处理,后续可以继续完善。
6.2.3. 检测 Xposed 模块是否激活
我看到网上有方法以及 AI 也会推荐下面的代码来检测 Xposed 模块是否激活:
    private boolean isModuleActive() {
        return XposedHelpers.getBooleanField(
                XposedHelpers.findClass("de.robv.android.xposed.XposedBridge", null),
                "isXposedModuleActive"
        );
    }
但是我实际测试时发现并没有效果,原理大概是因为 Xposed 进程位于不同的类加载器中,导致无法访问到该字段。
我在上面测试 New XSharedPreference 时发现当模块未激活时,MODE_WORLD_READABLE 会报错,而激活后则不会报错。所以我打算用这种方式来检测模块是否激活:
    private boolean isModuleActive(Context context) {
        try {
            context.getSharedPreferences("test_prefs", Context.MODE_WORLD_READABLE);
            return true;
        } catch (SecurityException e) {
            return false;
        }
    }
这种方式有时会失效,不知道是否和初始化有关,目前没有找到原因。
我还尝试了其他方式,比如通过 ContentProvider + findClass 的方式来检测模块是否激活,但是仍然没有成功。